
I know that you are probably on a journey to rid your home of toxic products. You are probably looking to do the same with your personal care products, too. Awesome. That makes me extremely happy …and we have A LOT in common! I have played around with this product for quite some time now. I have tried a few recipes online and even adapted them to try and create my own. I was never happy with the end product. Some were okay, but none were perfect.
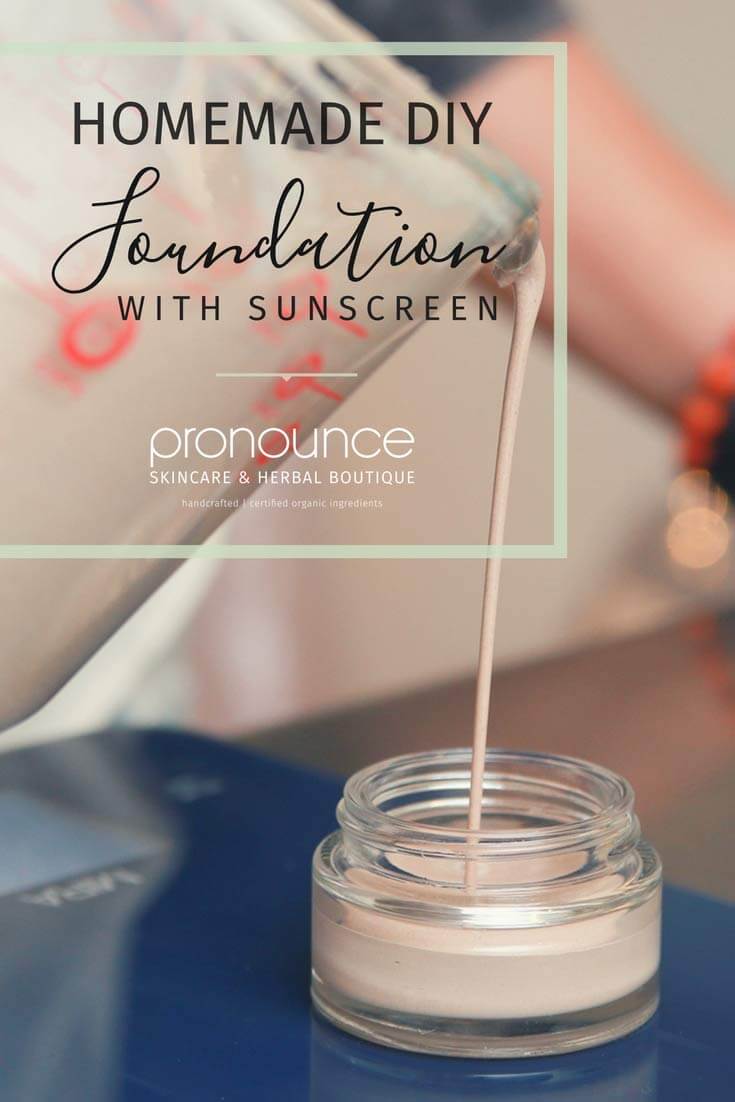
Finally, I believe that I have created the most perfect, healthy, non-toxic, organic, effective smooth finish facial foundation makeup …AND it contains sunscreen!
Since you are likely a lot like me in your green-living ways, you have probably dabbled in skincare products yourself: body butter, salve, deodorant, etc. As many of you might know, it’s become my ultimate passion… for good reason! I won’t get into it all here (I’ve already written a pretty extensive post re: the nastiness in skincare products), but I will say that makeup is one of the biggest offenders for nastiness.
I have been using a foundation that I thought was good quality (Lord knows it sure is CRAZY expensive… $45 for just over 1oz… ouch). Honestly, though… I bought it a while ago because it was mineral-based and because it did not have colophony in it (a random contact allergy I have).
I hadn’t looked at the ingredients until recently. Here’s what I found…
(Beige Ivory): Cyclopentasiloxane, Water (Aqua), Phenyl Trimethicone, Ethylhexyl Palmitate, PEG-12 Dimethicone Crosspolymer, Butylene Glycol, Silica Dimethicone Silylate, Isononyl Isononanoate Polysilicone-11, Dimethicone Glycerin, Sodium Chloride, Glyceryl Polymethacrylate, Phenoxyethanol, Trihydroxystearin, Diisopropyl Dimer Dilinoleate, Ethylhexyl Hydroxstearate, C30-45 Alkyl Cetearyl Dimethicone Crosspolymer, Sorbitan Sesquioleate, Propylparaben, Methylparaben, Ethylparaben, Butylparaben, Isobutylparaben, Retinyl Palmitate, Tocopheryl Acetate, Ascorbyl Palmitate, Silk Powder (Serica), Saccharomyces/Xylinum Black Tea Ferment, Propylene Glycol, Hydroxyethylcellulose, Camellia Sinensis Leaf Extract, Potassium Sorbate, Titanium Dioxide (CI 77891), Iron Oxides (CI 77491, CI 77492, CI 77499), Mica (CI 77019).1
I am almost embarrassed to show you this list, but it does feel good to finally know the horrific product I’ve been using for a year. I can now move on and make better choices.
Today, I am sharing that better choice with all of you, because I know that you want to make better choices, too.
Smooth Finish DIY Organic Foundation With Sunscreen (5OZ)
Supplies/Ingredients
- Double-boiler (I make my own with a glass bowl over a pot of shallow simmering water)
- Kitchen scale (this is my favorite kitchen scale)
- Whisk
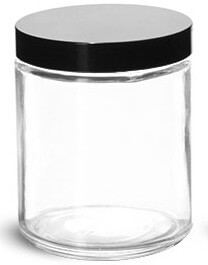
- Container for finished product (see more below re: container choices)
- 1.5oz Almond Oil (or unrefined, raw, organic carrier oil of your choice; learn more about carrier oils here; purchase Pronounce Skincare Herbal Boutique Almond Oil)
- 1oz Shea Butter (organic, raw, unrefined shea butter like this)
- .5oz Cocoa Butter (organic, raw, unrefined cocoa butter like this)
- .5oz Beeswax (this is by far my favorite beeswax)
- 1/8t Vitamin E (make sure it’s not from GMO sources; this is my favorite Vitamin E)
- .5oz Zinc Oxide (make sure it is uncoated, non-nano, and not micronized)
- Cacao Powder (organic cocao (or cocoa) powder like this)
- Cinnamon (organic cinnamon like this)
Make It
- Using your scale and the tare function, measure and combine the first five ingredients into the glass bowl into your double-boiler.
- DO NOT add the zinc oxide, cacao powder, or cinnamon!
- Completely melt the first five ingredients, stirring occasionally with your whisk.
- Remove from heat and allow to cool a bit (I just don’t want you to burn yourself with the hot liquid). Wipe excess moisture off the outside of your bowl.
- Place your bowl back on the scale, hit tare, and add in spoonfuls of zinc oxide until you get to .5oz. This gives you approximately a 10 SPF coverage (as it’s approximately 10% of the total weight… read more about sunscreen here). Whisk to completely combine.
- Add 1/8t cinnamon; whisk to combine.
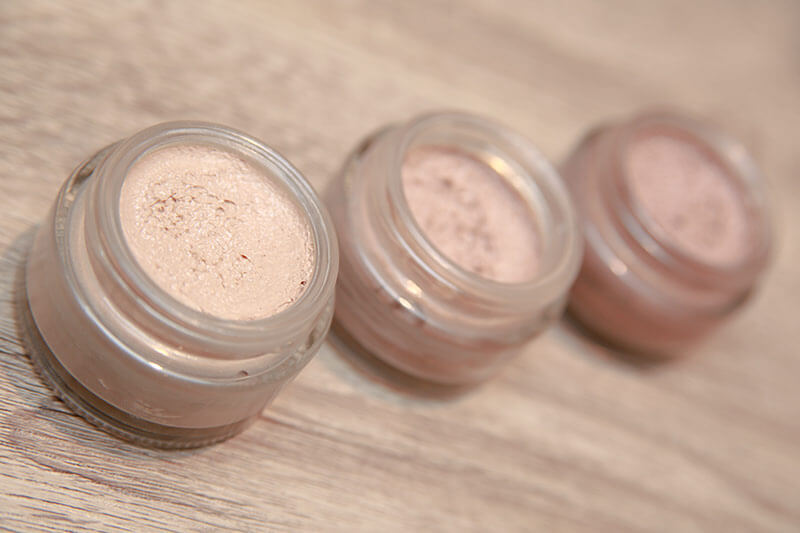
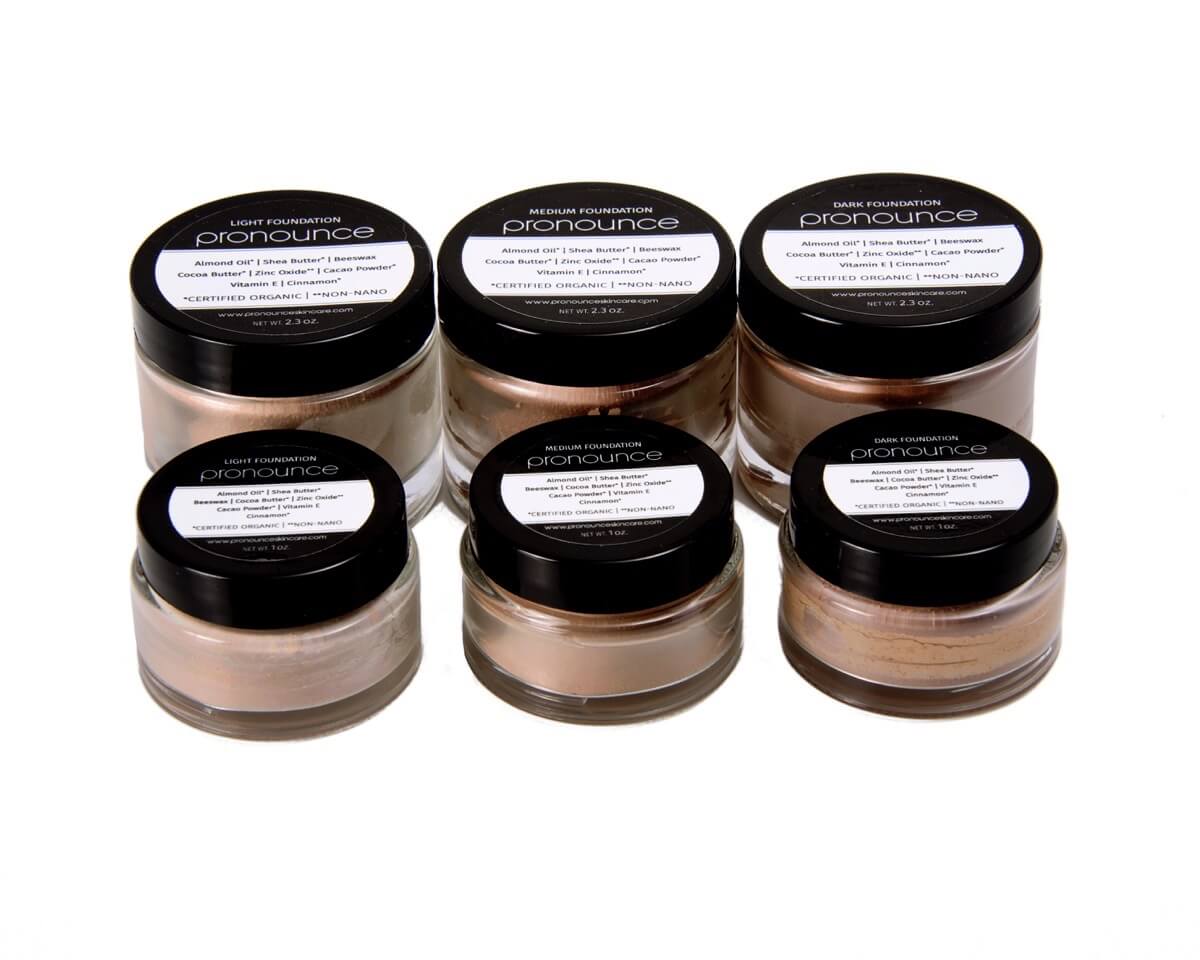
- Add cacao powder a little at a time and whisk to get to the color you need…
- 1/2T cacao powder is a light foundation
- 1/2T plus 1t is a medium foundation
- 1/2T plus 2t is a medium-dark foundation
- Simply start with 1/2T of cacao powder, whisk to combine, check on your wrist for a color match, and add more cacao powder (1/2t at a time) until you reach your perfect color
- Wipe any excess moisture off the outside of the bowl (water in this product is not your friend).
- Pour into your selected container(s) and allow to cool and fully setup.
- NOTE: You will likely have a bit of settling at the bottom. Don’t pour that into your container, as you will end up with flecks of the powders. We just discard that part here at the shop.
*T=tablespoon and t=teaspoon
That is it, friends.
Random Questions You Might Have
You have a few choices for containers and it depends on how you like to apply your foundation.
This is a silky smooth foundation. It is easily spreadable, yet firm enough to stay on for hours (thanks to the beeswax). As such, you can apply it in several ways and you have several container choices. Click here to take a look at the containers in Pronounce Skincare Shop.
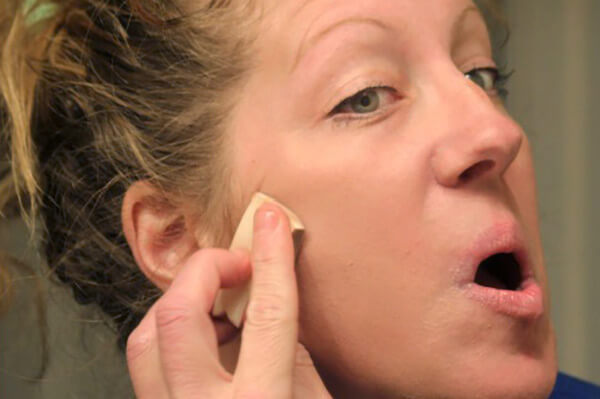
Your fingers work fine for application (as long as they are clean).
Simply scoop your finger into the container and apply directly to your face. Or, you could scoop a clean makeup sponge into the container and apply it that way, too.
Now you need the perfect powder!!!
Finally, my DIY Organic Facial Powder Recipe is LIVE! Click the picture to take a look. It could NOT be more simple, with only five ingredients.

Click a photo below and learn how to apply the foundation
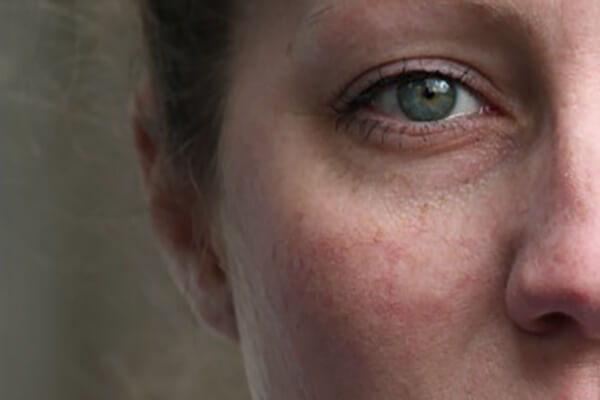
No foundation
With foundation
xo,

Want to try it?
but you aren’t always a DIY-ish person (or maybe you are simply lacking time, motivation, supplies, raw products, etc) Please, head on over to my Pronounce Skincare Shop where I sell the foundations.
While you are there, please look around at all of my other skincare creations. I love making them for my family and for you!
-
Facial Foundation
$25.00 – $45.00 Read more
-
Glass Jars (various sizes)
$1.50 – $3.50 Read more
Comments 445
I made your foundation, powder and blush last night and wore it today and love them all! I used grapeseed oil for the foundation and it feels so nice and satiny on my skin. Just one question out of curiosity, would adding more zinc or maybe bentonite clay give it more coverage? I haven’t decided yet if I even need it but it is very light coverage. Regardless….thank you for these recipes. I pointed at my face and said to my husband “This right here just saved us about $100!”. 😀
Hooray! Sounds like a fun day of DIYing! The foundation is intended to be light in coverage. I’m not sure that adding extra zinc or bentonite clay would help. That said, if you give it a try next time please let us know how it worked out for you. 🙂
Pingback: How Foundation is Made – Safe Spaces Will Help You
hola me gustaria saber la medida de el cacao y la canela se refiere a una taza o otro tipo
Hi there! Great question! The recipe calls for 1/8 teaspoon of cinnamon and the cacao will vary depending how light or dark you need it. You can start with 1/2 Tablespoon cacao powder for a light foundation, 1/2 Tablespoon plus 1 teaspoon for a medium foundation, or 1/2 Tablespoon plus 2 teaspoons for a dark foundation. You can start with adding 1/2 Tablespoon at a time until you find you perfect match! I hope this helps you 😊
La T mayúscula se refiere a cucharadas y la t minúscula es cucharadita
How long can this recipe last? I’m looking for me that lasts about 6 months
Hey there Raven! All of the ingredients in this recipe are shelf stable for 1+ years! I hope this helps you 😊
Hi Jessy,
I would like to ask, what do you think i should add to make it more fluid, to be able to put it in pump cream bottle? I have done one recently for myself and it’s amazing!!! Thank you very much! Love it!!!
Hi Anar! We’re so glad you love it so much! That being said, this recipe was created to have a thick, extremely spreadable butter consistency. Jess has never played with creating a foundation that could be used in a pump bottle. If you figure out how to make it “pumpable”, we would love to know! Happy DIYing 😊
Hello. I have a doubt regarding the cinnamon powder since it contains lot of fibres, it doesn’t dissolve in liquids like water, oil, milk, etc… so how will i get the creamy texture without any tiny pieces around? Could you please tell me how you dissolved cinnamon
Simply follow the directions and if your cinnamon is larger in size you’ll see it at the bottom of your double boiler. Just don’t pour that in. We usually leave a small amount of settlement that doesn’t get poured into containers. Happy DIYing. 🙂
Okay will try. Thankyou 😁
Just add extra oils to it.
Hey Jess. I was so happy seeing your recipe in Pinterest behause the Moste of the ingredients I had already at home 🙂
I tested it last weekend but it doesn‘t work really well – it‘s more like moisturizing me with a beige shea block.
I‘m shure I did something wrong so I want to ask you a few questions:
1. What do you think about jojobaoil or grape seed oil instead of almond oil?
2. Your .oz measurements are definetly the .oz on the weight and noch ne .floz in a bar, right?
3. For the powdery ingredients you used the big T and the small t. The Bit one is the tablespoon and the small one the teaspoon right?
Sorry for these stupid questions but I‘m from germany and I really want to make it correct the next time.
Yours Susanne
Hi Susanne! I’m sorry to hear that it didn’t turn out so well for you. :/ It is a light coverage foundation not meant to provide thick and full coverage. My powder recipe over top will ‘set’ and ‘finish’ the look and provide greater coverage.
You can sub pretty much any liquid carrier oil. t = teaspoon and T = tablespoon. I hope this helps!
Hey Jess!
I’m curious, if I were to leave out the zinc oxide, is there something I could use in its place in order to keep the texture right? Perhaps arrowroot powder? Also, my skin seems to be a bit sensitive when it comes to cinnamon, have you received any feedback in regards to that? Could I replace it with nutmeg?
Thank you for your time and energy, so so appreciated!
Hey Emily! If your skin is sensitive to cinnamon it’s okay to just omit it. As for the zinc, the recipe would not set up the same without it. It is an important part of what makes the texture what is in this recipe. Hope this helps you! 😊
Hello, I tried the foundation recipe and it looked grey at first and as I added more cocao, it looked purple! Can you tell me what I may have done wrong?
Thank you
Hi Danielle! Oh my…purple!?? How interesting! Did you use cacao or cocoa? I use cacao…I haven’t tried the recipe with cocoa. They are similar, so I’m not sure it would really make a difference? Have you tried applying it yet? Perhaps it doesn’t appear purple when applied? Let me know how application went and maybe we can brainstorm some more.
11/18/19 update – I received the following note from a fellow DIYer, “Hey there! I saw a comment under your recipe for foundation about it turning purple — I got the same results and I’m pretty sure it’s from subbing cocoa powder vs raw cacao. Just wanted to pass it along. Thanks!” It sounds like cacao (not cocoa) is a must.
In your recipe above, the spelling is cocoa. I hope to try this recipe soon!
Hi Kathy! Thanks for your feedback. Yes, can substitute cocoa, but I prefer certified organic cacao. Let us know if you give it a try. 🙂
11/18/19 update – I received the following note from a fellow DIYer, “Hey there! I saw a comment under your recipe for foundation about it turning purple — I got the same results and I’m pretty sure it’s from subbing cocoa powder vs raw cacao. Just wanted to pass it along. Thanks!” It sounds like I’d steer clear of cocoa and use cacao. Happy DIYing!
You could try adding a *TINY* bit of turmeric to salvage a purple batch; yellow + purple = brown. Bonus points for turmeric being anti-inflammatory…
Mine didn’t come out like this. It came out more of a balm texture instead of a mousse looking one like yours. Can you tell me what I did wrong?
Hi Rebecca! This is a much thicker texture than any other foundation I have ever used. It kind-of is more like a balm. I scoop it out with a sponge, touch it to my face to warm, and then rub it in. Your powder over top will ‘set’ and ‘finish’ your healthy new look and give you greater coverage. I hope this helps. 🙂
This is fabulous! I have very fair skin and am always looking for a good sunscreen but I detest the way they feel on the skin. This formula sounds amazing! I also love the fact that it kills two birds with one stone, something I am definitely a fan of considering I’m trying to simplify my beauty routine. Will have to try this!
Nice article! You are sharing a great recipe. I can’t wait to try it. Thanks for sharing.
Hi, thank you so much for this recipe, I just love it! One question: I don’t use it everyday and I made it a while ago (about a year and a half), do you think it is still good? What is usually the shelf life of a product with vitamin E ? Thanks
Hi Laura! Yay…I’m glad that you love it, too. 🙂 The ingredients used in the foundation have a very long shelf-life. As long as it’s been stored with the lid sealed properly and not in extreme temperatures you *should* be good to go. Definitely do a smell test to see if it smells “off.”
I have been using this along with your powder recipe for about two weeks now and WOW. This is the first time in about two years that my skin doesn’t look dry and flaky halfway through the day. Not only does it allow me to finally wear foundation again, but it is moisturizing and healing too. My skin has become VERY sensitive in the last couple of years and this doesn’t bother me at all. Thank you!
Oh My Goodness…I am so happy for you! I’m so glad that it’s helping you so much. Hooray for healthy skincare!
I might have done something wrong… It’s a little thick and sort of just rests on my skin so my face is shinny when I have it on. I haven’t tried to put powder on top of it yet. Any suggestions on where I went wrong?
Hi Debbie. Sorry for my delayed response. Yes, this is a thick foundation. You’ll want to let is soak in a bit, and then apply you powder over top. You’ll see much greater coverage then.
I would like spf of at least 30. Do I just up the zinc oxide. Thank you
Yes, you got it. Happy DIYing!
This looks amazing — can’t wait to try it!
How do you lighten it up, make it less waxy?
Hi Jayne! You definitely could use less beeswax. It may come out a little softer and ‘dewier’. We have never tried it this way though. You can always top it off with our facial powder, if you prefer a more matte look. I hope this helps you!
Hi Jess – I have made your face powder and it’s great for my skin. Nothing at all ever suits my skin – I have Rosacea and extremely sensitive skin, so I’m delighted – thank you. I now want to try your organic foundation recipe but have read that cocoa butter is highly comedogenic and, in the past, I’ve suspected that it’s one of the ingredients that doesn’t agree with my skin. My question is: can I just use more Shea butter instead of cocoa butter i.e., increase the Shea butter to 6oz? Would that work? Many thanks
Hi Sylvia~ I’m glad that you are loving my face powder recipe, too. 🙂 Yes, you certainly can add more shea than cocoa. Whatever you take out of the cocoa, just add in the shea so you use the same amount of butter. Happy DIYing!
Can you use cera bellina vs beeswax? My guess it would be more gel like vs dense cream. What do you think?
Hi Nancy. Sorry for my delayed response. I think you were referring to candelilla wax. I haven’t personally worked with it, but I do know it is more dense and harder than beeswax. If you gave it a try I’d love to hear how it turned out!
Could essential oils, such as Rosehip or Frankincense, be added to help make this an anti-aging foundation?
Hi Rebekah! Sure, you could play with some essential oils in your foundation. We just want you to make sure you follow proper dilution guild lines! You can find the guide here (our sister blog Scratch Mommy)! Happy DIYing 😊
Can i try titanium dioxide instead of zinc oxide? Is there any other alternative for that?
Hi Khris~ Yes, you certainly could! I haven’t done that myself and haven’t researched the amount you’d want to use…it might change…I honestly have no idea since I don’t work with titanium dioxide. If you give it a go I’d love to hear how it goes!
Hi, looking at the finished product, it seems to be a cream foundation. Is there anything I can add more or less of to make it a liquid foundation? Is it waterproof, does it feel heavy, and does it oxidize or separate after wearing it for awhile? My T-Zone is more oily than the rest of my face, will this mattify it for all day wear, how long does this foundation usually stay on for, or what skin types does this typically work best for? Thanks!
Hi Paige~ Great questions! Yes, this is a thick foundation, which was what I set out to create. You’d have to play around with the recipe to make it more liquid, and I haven’t done that myself. It does have some waterproof properties because of the beeswax. It does not separate and it does not feel heavy. The powder overtop of the foundation gives you that matte look. I’ve found and heard that the foundation is great for most skin types. You can read reviews of the foundation in the shop under the ‘discussion’ tab here. I hope this helps. Happy DIYing!
Hi Jess,
I am looking at trying some of your DIY recipes, but was wondering if the beeswax you use in your recipes is emulsifying wax or non emulsifying?
Thank you
Hi there! Hmmm, I’m not sure that I follow your question totally. Beeswax by itself is not an emulsifier. You can read about the beeswax that I use in my products and sell in my shop HERE. But, again…beeswax by itself is not an emulsifier (you’d need other ingredients added with the beeswax).
Hi Jess,
Thank you for your reply.
As you know, if any of your recipe would require mixing oils and water, then just by adding beeswax this wouldn’t bind the oil and water together, you would need an emulsifier.
I have read the description of the wax you are selling where it says that the wax will “help to bind and emulsify ointments, lipsticks and lotions”, which made me think that it must be emulsifying wax, otherwise this would just help to mix the ingredients but not to bind them together if there is oil and water in the mix.
Hope you understand what I mean now, as I am still confused if I need emulsifying wax or just normal wax.
Thank you
There is no water in this recipe and in this particular recipe you need only beeswax. I hope this helps. 🙂
Can I add any essential oils to this recipe? Sorry I didn’t see my comment post. Trying again..
Hey there Clarissa! Sure, you can add essential oils if you’d like. Just be sure you follow safe essential oil guidelines before adding them.
hi Jess,
i want to make it water based foundation with sunscreen, so any ingredients to add or to remove and what formula guide calculation can use.
Hey there! This recipe was created to to be a bit thicker and creamier. We haven’t tried to play around with a water-based foundation. I’m sorry, I wish I could help you more. If you figure out how to create one, please come back and let us know 😊
I was scrolling through the comments trying to find an answer but wow! there are a lot of comments… I’m curious about blreakouts. Did anyone experience breakouts or could I add anything to help my breakouts as well??
Good Day! How long does it keep for storage? What ingredients can I add in that can keep it last longer. Thank you!!
Hi there! You shouldn’t have to add anything to this recipe. All of the ingredients in this recipe have a shelf life of 1+ years. Happy DIYing 😊
Natural and cheap! Made a spreadsheet to estimate the cost per batch before I buy; unless I made an error (don’t think so) it costs less than $5! Plus, many of the ingredients last 2-3 years or more if stored correctly.
Note: These are all products found on Amazon, majority if them organic and the like. In store would likely be even cheaper.
Would love to make these as gifts. Would I be able to make the recipe up until adding the cocoa powder, and mix that in at a later time?
Hi Kris! What a lovely gift to give 🥰 you sure can add the cocoa powder later. Just melt it back down before you add the cocoa and voila! Happy DIYing 😊
Is this alright to use on oily skin or will it clog the pores?
Hi Judith! This is safe to use on oily skin. I, personally, have never felt like it clogged my pores. You could try cutting the recipe in half to try it out and see how it works for you! I hope this has helped you 😊
Hi Jess
Can I use vitamins E powder?
Hey Christine! Honestly, we don’t know much about vitamin E powder. We have never worked with here at the shop. I’m sorry, I wish I could help you more.
Hi, can I use bentonite clay instead of zinc oxide? I am not able to find the non nano version in India.
Hi there! I don’t think the recipe will work without the zinc oxide. If it helps, I ship worldwide and carry non-nano zinc oxide here. Happy DIYing!
Thank you for this recipe! I’ve been wanting to make my own liquid foundation for a while. I used this as a base (changing the carrier oil from Almond to Safflower since I have oily skin). I tried it three times using cocoa powder as the color but it was total fail; it just did not match my skin tone at all. Since I have raw mineral ingredients I use for my DIY powder foundation, I used those instead and it turned out perfect!
What is the shelf life on this foundation?
All of the ingredients in this recipe are shelf stable for 1+ years!
Would it still come together well without the vitamin E?
Hi there. Yes, it sure well. It just helps increase the shelf life a bit, but it will come together just fine. 🙂
Hi!
This is a great recipe and the colors of your foundation seem to be like those found in stores! I would want to try this recipe out but would it be all right to omit the beeswax and just add more shea or cocoa butter instead, or does the beeswax help to bind everything together or make it spread better?
Hi Marie! The beeswax is a necessary component to my recipe. :/
Oh my god I can’t be happier with the result , I was looking for a natural foundation because I put foundation on everyday but I don’t like the one that I bought and they were expensive , this one has a good coverage and it’s just so perfect for me! The only thing that I changed in the recipe is the carrier oil I put less I think that gives more coverage anyways thank you soooo much for this recipe !!!
Yay! I’m so glad that you love it, too. Enjoy!!
Hi Jess, Since it was mentioned in some other questions, I wanted to know can you use lesser amount of the carrier oils? And if so, What type of oil would you use less of and how much less? Another question is related to the other question that was Iab out the bee wax, they look like corn kernals, how do you make them smooth is the recipe so it will not be lumpy? Also, how do you color the foundation and other makeups to get them the color you need? Thank’s Jan
Hi Jan! We have never tried to use less carrier oil than what’s listed in the recipe. About the beeswax, yes melting down the beeswax will create the smooth-look you’re looking for! You can color the foundation with various amounts of cacao powder to find your perfect color. I hope this helps you! 😊
Hi, this is probably a silly question but is it Cocoa powder or Cacao powder? The recipe says cocoa but the link you recommend is to Cacao. Thanks, can’t wait to make this!!
Hi Courtney! We use cacao powder in this recipe! Thanks for pointing that out to us, we will get it fixed 😊
I love this DYI! It makes my skin feel and look so good without being too heavy!! Also such a cheaper healthier alternative!!
Yay! We’re so happy you love it as much as we do! 😊
Has anyone tried whipping this foundation to give it a lighter texture?
Hey Addy! I have not heard of anyone whipping their foundation. That sounds interesting! If you give it a try, come back and let us know how it goes! Happy DIYing 😊
Hello 🙂 I came across your post and it is wonderful but I have a small question please
I’m vegan, there is a possibility not to use beeswax in general and it will still work?
TNX ☺
Hi Elle! You will still want to use a wax to keep the same consistency. We have many other diyers tell us they’ve used vegan waxes in place of the beeswax. Happy DIYing 😊
I am worried the different oils will cause my already terrible acne prone skin to worsen. Are there other oil options? Only one I have found that I can use is Jaboba oil. Any advice is welcome and appreciated. Love your blog!
Hi Laura! You can absolutely use jojoba oil in place of the almond oil since it works best for your skin!
How long is your foundation good for? When does it expire?
Hi there! All the ingredients in the recipe have a shelf life of 1+ years!
Can i switch out beewax? I want to try to make it vegan.
Absolutely, Ivy! Let us know how it works for you 😊
I’m going to try making this for the first time. When I went to purchase the organic beeswax, I found that there are yellow pellets and white pellets. Does it matter which one I use? Will it make a difference?
Hi Laura. I prefer yellow beeswax, as it has not been bleached. I sell yellow, unfiltered, raw beeswax in my Herbal Boutique HERE. You might check it out. 🙂
You will need to do a cleanse to rid your body of all the toxins…I found this out when I went to my own deodorant. Much better.
Hello! I needed to make this before I was able to buy the zinc. It’s a bit oily without it so I’m wondering if you think I could carefully reheat it and add the powder? Thanks!! My skin feels so soft and smooth after using this! I love the look and feel of my face when I combine this with a little of your powder version and I have acne so that says a lot.
Hi Bailey! I’m glad you love the feel. Right you are…without the zinc it would be quite oily! I’d reheat in a double boiler over low heat and add the zinc. Then it will be perfect.
Oooooh my! This stuff. It’s gold baby! First, my face FEELS amazing, I have to repeatedly tell myself to stop stroking my face (it looks super awkward…a grown woman petting her face :)…and it rubs off my AH-mazing foundation!) Second, my face smells like a chocolate bar…seriously, that is enough on its own! AND! I took your same recipe, added some spirulina,
BOOM! Blemish cover-up!
Next I’m going to try to add Turmeric and see if it will hide my dark circles (plus Turmeric is an anti-inflammatory!).
Finally, I have to share a story (it’s a tad long, bear with me) that is testimony on how wonderful this stuff is…I was downtown and stopped by our local news team they asked if I would answer a question about our pending state government shut-down (FYI, they did pass a budget!). So I obliged…my daughter calls me…”MOM! You were on the news! My co-worker started talking about the shut-down and showed me the news clip…and I was like, HEY! That’s my mom! and my co-worker said, No it’s not! She looks way to young to be your mom! Look at her skin!!!”…side note: I am 48, my girl is 23. THEN! I went to see my mom, she said “HEY! I need your autograph, you were on national news! My friend called me from Utah and told me she saw you (same news clip)…and asked where did you get such beautiful skin!?”
It was all you Jess!!! You and your wonderful…”like gold” foundation and powder recipe!!!
OhEmGee…what an amazing testimonial, Lori!!! I am so glad that you are loving your healthy new goodies…and people are taking notice of your radiant skin. Hooray for healthy DIYing! 😀
Hi, I’m just wondering roughly how long this lasts before going bad? How can you tell if it’s gone bad? And do you have to keep it in the fridge? 🙂
Thanks
You do not need to keep it in the fridge. Use a clean sponge or hands to apply and you’ll go through this long before it goes bad. Don’t let water get into your container! I have never had one go bad and haven’t heard of anyone having one go bad. It would smell ‘off’ &/or look funny (noticeable color change, mold, etc).
Just made this foundation and so far so good! It does have very light coverage so I still used a little concealer on my melasma patches. And for anyone feeling it’s too oily (which I thought when I put it on) once powder is on over the top it feels much drier. Where I spread foundation down my jawline and haven’t added powder (shop bought mineral at the moment, I’m waiting for my spice grinder 🙂 it still feels pretty greasy and hasn’t soaked in like I thought it might.
Hi Jess
I am very keen to try your receipe but with my experience of using cinnamon for other homemade facial stuff I know it can be grainy. Your quantity is very small ao i suppose you wpnt feel it when applying. What is the purpose of the cinnamon .
The cinnamon gives your foundation a bit of a richer color. You can absolutely leave it out, though!
Love, love, LOVE this! I don’t actually wear it, I stopped wearing any makeup but Mascara ages ago, but my mom likes to wear a tinted sunscreen. And after seeing it on her I just might mix up a batch for me! I did add a little beetroot powder to the mix to give it a little bit of a pink tone (it was the only thing in the pink/red color family I had on hand) and we managed to match her skin tones almost exactly. She loves it! She loves the way it feels (I haven’t put it on my face but mom says it feels amazing and seems to make her skin feel softer). We use DIY body wash, moisturizers, scrubs, body butters and face serums. Makeup seemed the next step in the progression to all natural DIY beauty products. Thanks soooooo much for this great “recipe”!!!!!!! I’m off to make the face powder now….. then the blush when my “pink powders” arrive. Who knows, I might rethink my stance on wearing make up. Or I might just have a blast making these for friends and family ????????????
What a wonderful testimonial. I’m so glad that you and your mom are DIYing your own healthy makeup. I warn you…it’s addicting! 😉 I’m so glad you two are enjoying my recipes.
[…] with sunscreen is an absolute hit on Pinterest. She has a full step-by-step recipe on the blog here, and you’ll see how easy it is to make. However, if you’re not that into DIY or just […]
Hi, aside from sunscreen is there any other reason to add the zinc oxide? It is an ingredient not available here (Central America)
Hey, Katie!!! It’s actually pretty important, due to it offering so much coverage. It is in most foundations (homemade or bought) because it covers and smooths out so well. 🙂
[…] a long time coming. If only there were more hours in the day (are you saying that with me)!? After publishing the DIY recipe and selling my Organic Foundation (sunscreen, moisturizer, & foundation base – […]
[…] other super simple recipes include: lip balm, eye makeup remover, foundation makeup, sunscreen, and sleep […]
[…] and everyone else can simply purchase my healthy deodorant. I recently did the same thing with my Smooth Finish Organic DIY Foundation (with sunscreen). The DIY recipe has been a hit AND it has been a hit in my […]
I love the fact that we can make our own diy foundation without all the chemicals however im not sure how to get some of these ingredients. I also went on your shop website but the foundation is expensive and I think i would prefer something cheaper.
Author
Hi Melody! I’m glad you enjoy the idea of my non-toxic DIY foundation recipe. There is a big need in the market for a natural, non-toxic foundation alternative for those natural, but healthy, look days!
You can find almost all of the ingredients to make this yourself in my Pronounce Skincare Herbal Boutique. As for the product, I do my best to be uber competitive in the handcrafted skincare world. Your Pronounce Skincare Foundation is made by either my hands or my employee (or both)! Feel free to price out both options (DIY or BUY) over at Pronounce. Good luck in your search!
Melody, you can find a lot of these ingredients on Amazon, or your local health food store. I just found Rise and Shine Zinc Oxide powder on Amazon, for a very reasonable price. The company seems to really care a lot about the earth and quality of their products. I haven’t yet made my own makeup since I don’t typically wear it but would like the option of making my own when I do want to wear it. I do make most of my other body care products, and only purchase castile soap. You can get beeswax locally; find your local farmers online or at the farmer’s market. You can also order online. You can even get organic coconut oil at your local Sam’s club (make sure it’s the unrefined one, as they also now sell the refined one). Good luck and have fun!
I stock many of these raw certified organic ingredients in my herbal boutique!
HERE is non-nano zinc oxide
HERE is beeswax
HERE is our virgin, hand-pressed coconut oil
I hope this helps!
I love this recipe (thank you so much for sharing!) and have been making it a few years now. I whipped up a new batch today and completely forgot the carrier oil (I usually use Almond oil). I was going to melt it all back together, but instead tested it on my face and I LOVE it!
Without the carrier oil it is more creamy/less oily. I have “mature” skin and it looks great, covers better, and feels less greasy than the original recipe. I kept all of the other ingredients the same, so there is more zinc oxide percentage, but quite a bit of it fell out of solution.
I wanted to mention that is was a viable option if you wanted a slightly more creamy/thick foundation that still feels silky smooth.
Hi, thank you so much for a great recipe! I’m so glad you found the perfect mixture and then shared it with everyone! I’ve looked for a liquid foundation recipe before, but usually the ingredients or the process was too involved. I love yours because the texture was PERFECT and the ingredients are so simple! I used mica powders to color mine, but other than that, I followed your recipe and I love it! Thank you!
Can you please give me an idea of what colour oxide to use and the amount that would be needed for this foundation? I have medium coloured skin
Thank you
Hi! I appreciate you sharing your recipe. I’m definitely gonna try it, but without the zinc oxide. I find this ingredient in all organic makeup brands and I was wondering how come the product is organic, since it contains zinc oxide. Isn’t it chemical? Do you think the foundation is gonna last without it?
Thank you in advance!
Author
Hi there. Thanks for your questions. First, if you make this recipe without zinc it will not set up, period. The zinc is crucial in the recipe. Second, it can get confusing, but basically…
Everything is a chemical. Zinc comes naturally from the ground…you just want uncoated, non-nano, and not micronized zinc oxide. That is what I use in my SkinShade and in my Foundation (and you can purchase it from me here). I hope this helps!
Love it! Can’t wait to try it out
The link for organic cinnamon on Amazon is not working and/or no longer available. Could you update this and specify for me which type (is it Ceylon?), please? 🙂
Soooo excited to have found your website & give this a try!
Author
Hi Rachel. Eek! I will update the recipe for others. I use Cinnamomum Burmannii (also known as Cassia), as it has more depth in color. You certainly could use Cinnamomum Verum, or sweet or ‘true’ cinnamon, but you won’t get the same depth of color from it (although I do prefer to use true cinnamon for cooking). I hope this helps. Happy DIYing!
Hi,
Thank you for sharing this with us!I’m really eager to try!
However, I’m wondering if “oz” refers to weight or volume?
Thank you!
Author
Hi! Just use fl oz on your scale for weights in this recipe and you’ll be good to go. 🙂
Thank you. It’s an amazing recipe. It gives light coverage but I am able to use it as moisturizer, highlighter, lip balm and tinted sunscreen. It makes my skin look great.
Author
<3 I'm so glad that you love the foundation recipe, too!
Question: I KNOW I cannot be the only person who has experienced this, but is re-melting the only way to deal with the “beading” up of the DIY Foundation – which I LOVELOVELOVE, btw!! It’s creamy and smooth after I make it, but after about a month, I notice little beads. The same thing happens with my DIY Lip Gloss after a while, and though they ultimately melt into the skin, I wonder what it is? My Lip Gloss shares ingredients: cocoa and Shea butters and beeswax. Super easy to just warm up the Foundation, or spend the time to work it into the skin but wonder if anyone has figured out a way to prevent this? Recently, I needed to darken the shade (summer!), so I remelted it in a hot water bath, and added more cacao powder, and it was lovely and creamy again for another month, and that might be the best workaround. But interested in other people’s experience. Thanks!!
I have the same problem!
Author
It’s probably your shea butter! Shea butter will separate out a bit after a while. You can help prevent this by tempering your raw, unrefined shea butter before using it. As long as you aren’t talking about mold (which it doesn’t seem as though you are), it’s just that raw shea butter separating out a bit. It should still be just fine to use. Remelting is fine…I just work mine into my skin with a makeup sponge. I hope this helps! 🙂
When making my lip balm I opt out of the shea and replace it with mango butter. I have tried to temper shea butter and still get the grittiness.
Betty – we love mango butter here at Pronounce 😊
So…I love this stuff. I think of it more as tinted day cream then a classic foundation but I do love it. I think it’s key to pair it with the powder recipe.
I added turmeric to mine as the colour just didn’t have the depth to match my skin. I still think it needs a touch of pink but I am not sure what to add, I’ll experiment next time.
Love it, thank you dor all of the wonderful DIYs!
Author
Yay! I’m so glad that you love it, too. You could try adding some hibiscus flower powder for pink undertones. If you do, let me know how it turns out! Happy DIYing. 🙂
I just made this and the powder today, my face smells like a brownie lol! Thank you for your recipe and all the other helpful information!
Author
Ha! Mmmmm, organic chocolate. 😉
You are very welcome. Enjoy!
I recently just made this and I love it! I made the foundation and the powder, and now it’s good bye drugstore brand which costs more than making this. Thank you.
Dear Scratch Mommy,
I made this recipe and I love it! However I skipped the vitamin E (simply because I didn’t I didn’t have it and also since I poured in Avocado oil as my carrier oil which already contains vitamin E if I’m not wrong?) However now I am worried about oxidation anyway… I read that the cinnamon can act as an antioxidant, but do you think that I should pour in some pure vitamin E as well to ensure that the oils in the cream does not oxidate?? (I have bought it now) Or is it too late to pour in into an already made cream? Thank you
Author
Hi Suzana! I’m so glad you are loving your new foundation. 🙂 Sure, if you melt back down over your double boiler and add some vitamin E. I would do that, personally, but you should be okay so long as you are using a clean sponge for application on a clean face. Again, so glad you love the foundation, too!
Thanks a lot for your very quick answer! So I cannot just pour the vitamin E into the jar, I will have to melt the ingredients first? (Would melting it be ok even though there is Zinc in it?)
Thank you so much once again for your recipe – it really is lovely, not to mention the texture! (Although next time I will pour in some more cocoa powder into it since it makes me appear a bit too white!) 🙂
Also, when your write 1/8 t – do you mean 1 to 8 teaspoons?
Hi Jess! Can I make the foundation without vitamin e? Thanks
Author
Hi there! You sure can. I strongly recommend the vitamin E, but in a pinch (for a small batch) you could do without. Happy DIYing!
First of all, thank you so much for your recipes – I love them all. I am only waiting for my ingredients to arrive and them I am totally ON IT.
I found your website while looking for a DIY BB cream. You know what girls call DIY BB cream this day? They tell you to mix your cream, sunscreen and foundation all together and voila – you have created bb cream. So I’ve almost lost hope and then I find your site and your recipe. And I immediately know that THIS IS IT 🙂
The only thing that concerns me a little is the comedonic rate of cocoa butter and cocoa powder – I am afraid that it will clog the pores. Does it clog your pores when you wear it?
And question to all the girls that have tried it – does it clog your pores?
Because maybe I can avoid cocoa butter and replace it with more shea and rosehip oil instead. Do you think it will change the mixture a lot? Cause with all these butter – it just seems to be so much to be put on the face! I would prefer to have something more liquid and lighter instead. And I have been thinking about using natural mica pigments instead of cinamon and cocoa. Have you thought about using them? They are not edible, but definitely they are mineral and therefore natural. And it would solve the pore clogging issue, if it exists at all.
And keep doing what you’re doing! You’re an example that I intend to follow 🙂
Author
Hi Domi! First, thanks for the kind words. I love creating my own products and sharing the recipes (and products for sale, too). I have had no issues with clogging, in fact, my skin has never been more clear! You could try shea butter, but I have not yet tried that. You can learn differences between butters in this enlightening post. I have played around with mineral pigments and had some success. If you go this route, my tip is to not use too much. They are powerful! Happy DIYing!
Oh, i am so happy i clicked on this link. I have been making my own natural bath products, lipsticks, balms, glosses and faces creams for 6 months now. Now i can add DYI foundation to my list. I cannot to make this.
I also saw in some comments above about buying the products they need. I buy a lot of my ingredients from Brambleberry. Just google the name, they are great company.
How vital is the cocoa butter in the Foundation Recipe? What is the difference between the cocoa butter and the shea butter. I am struggling to find raw cocoa butter and was hoping to avoid ordering it online because the shipping costs as much as the product .I am also just curious as to what the cocoa butter lends to the recipe. Thanks in advqnce.
Author
Hi Krista. I haven’t made this with just shea butter. Perhaps someone else will chime in. Take a look at this post here on our site to learn all about butters…I think you’ll find it enlightening. Happy DIYing!
hi what is the shelf life of this diy foundation?:)
Hi there Abigael! All the ingredients in this foundation have a shelf life of 1+ years. We have never had someone come to us and tell us their foundation has gone bad. I hope this helps you!
Hmmm I have never thought of making natural makeup…. since I don’t wear it. Lol. But this recipe looks amazing!!! I am going to give it a whirl in a half batch, to wear on nights out. The sunscreen recipe is such a success I am sure this will be amazing too. Thanks for sharing and your continued work to bring eco conscious products to the world. ☺
Hi there,
I am looking to try this recipe, just wondering, for the beeswax does it have to be refined or unrefined?
thank you!
ALso, I have looked through many recipes, and this one definitely excites me the most, the pictures of you wearing the foundation are beautiful! Thanks for sharing your recipe!
Author
Hi there! I always prefer unrefined beeswax, but if you already have refined you can certainly use it. Thank you for the kind words. And I’m happy to share my recipes. Happy DIYing!
Hi from Georgia. A friend gave me a copy of “Willow and Sage” in which your DIY foundation and mineral powder was featured and I was hooked. I’ve been a “from scratch” girl all my life–cooking, sewing, crafting, in general all the homemaking arts. I’ve dabbled in some DIY body care products but nothing very serious. Fast forward to 2015. The cosmetic foundation that I’ve used for years is no longer available in the form I prefer so I was delighted to entertain the idea that I could make it at home for a FRACTION of what I’d been paying all these years. I made some last weekend and have been truly pleased with the results. I am still tinkering with the opacity, but research has shown that additional zinc oxide will help with that. I got the color perfect using the medium recipe with a few addition shakes of cinnamon and cocoa. At first I was concerned that I wouldn’t be able to stand the strong fragrance of the cocoa butter, but it seems to have dissipated some since I made it. With the cool temps, the foundation is very firm in the jar, but scooping a bit into the palm of my hand melts it beautifully for application. I’m still using my face powder that I had, but will venture into making some mineral powder when the other is used up. I do wonder at the foundation’s staying power during our warm summers here in southwest GA, but then I don’t use foundation as much during the summer going with moisturizer and powder. So I’ll try DIY moisturize with mineral powder. Thanks again. It is so fun to discover and try new things especially when made from scratch.
Author
<3 And reading this just made my Friday. <3 I'm so happy that you are loving my DIY Foundation recipe, Denise. Thanks so much for stopping by to share your success and love of my recipe!
Is it possible to do the foundation without the Zinc ?
Author
Hi Mad. Unfortunately, not really. It’s a crucial part of the recipe.
Hi! I really want to try this, but I don’t want to use zinc oxide. How would kaolin clay work instead?
Author
Hi Ashely. Feel free to give it a try, but I honestly do not believe it will work for you. They are two totally different ingredients with totally different textures, colors, feel, etc. You can purchase zinc in my skincare shop, if that helps.
O.M.G., Jess – I LOVE this recipe – it’s BRILLIANT! Just made it for the 2nd time for Christmas presents, and I can hardly wait! I used your measurements for a medium color, and was generous with the cacao powder, and it’s perfect. What I did differently this time, is sift the dry ingredients before adding and it worked really well. If this recipe were music, it would be a masterpiece! It IS a masterpiece! Thank you so much! Wishing you and yours a peaceful and happy holiday season!
Author
Hooray! I’m so glad that you love my foundation recipe, too. AND…so glad you are giving them away as gifts. Share the Scratch Mommy love! 😉
Thank you, thank you. Happy holidays to you and yours, too!
I have been into oils and natural for some time. I have spent time and money on many different recipes for foundation and facial power. It has been discouraging as some were to dry, some too oily, etc. I tried my own recipes many times after much research. I gave up and continued buying makeup closest to natural and healthy as I could find. They still seemed to make me feel like I had makeup on my face. Didn’t feel light and breathable. I just mixed up your recipe for the foundation and the powder. WOW, you have achieved a great product!! If I did not have all the ingredients I would be purchasing from you because your prices are very reasonable for such a great product. I am impressed. Thank you!!
Author
<3 Thank you so much for the kind words, Paula! I'm so glad that you love the foundation and powder, too. Enjoy...and happy DIYing! :)
This seems very good but I just want to ask if I can use something else in place of beeswax since its not so easily available here.
The foundation had very good coverage and the result was smooth and far superior than any commercial product I have ever used. It also left my face feeling soft and moisturized afterwards. The only problem I had was matching my skin tone. I used a lot more cacao than your recipe and it was still lighter than I wanted. But I correct the problem with the diy powder so no worries there. For color I used cacao, nutmeg, cinnamon, a dash of ginger and a small amount of uncolored mica which provides a nice glow. Unfortunately I was so excited to be making this that I forgot to take notes! The powder is definitely needed for a good finish. I also like the fact there is no water so it doesnt spoil easily and no emulsification needed. This recipe is perfect for me and I am so happy I found it. Thanks so so much for sharing this!!! I am going to start experimenting with your other recipes as well.
So I just made this and I totally love it! However, mine has little specks of white in it (probably the zinc oxide), and they eventually fade in on my face, but some don’t. I just flick those off, but do you think this could be because the zinc wasn’t ground up enough? Or might some other reason be the culprit?
Hi Autumn! Yay! We’re glad you love it as much as we do! Hmm, interesting. My guess would be the zinc as well. It could just be a matter of the zinc needing to mixed in a little bit more. Or it could have been from the bottom of the batch. Here at the shop, we discard the bottom of the batch because of the flecks that have settled to the bottom. I hope this helps you 😊
When you mention let it cool for a few minutes, do you mean until it is opaque and but still soft enough to whip? Or just opaque along the edges? I tried this and mine came out looking like chocolate pudding instead of a paste. I added the the dry ingredients after it cooled a bit (edges turning opaque).
Thanks,
Shari
Hey Shari! It sounds like you did it right! You just want to be sure to put the powders in when it’s still liquid. This will help when whisking together all the ingredients. The ‘let it cool for a few minutes’ just let’s people know to not put the powders in when it’s still screaming hot. I hope this has helped you!
Hi,
I love your recipes, I just wanna ask on one thing. If it matter to use organic, raw, unrefined oil if you heat them later on. They don’t lose all the vitamins by this process? Can you melt ingredients without heating to keep all the profits from raw unrefined oils?
Author
Hi Nikola,
Great question!!! Yes, heating these raw, organic, unrefined ingredients over a very low heat using a double-boiler maintains all of the inherently excellent qualities within the butters and oils. You do want it very low…and it will take a while for it all to combine, but that’s why you do not use direct heat and use a double-boiler. Always keep this in mind for any DIY skincare recipe, that using a double-boiler is definitely the way to go. Mine is simple a large clear glass bowl over a pot of slightly simmering water (just steaming, really). Again, excellent question. Happy DIYing!
Hello,
I just made my first batch of foundation and love how fantastic is has turned out. My question – what can I add to make the color a little more on the pink side?
Love your site and I thank you for offering information. Teri
Author
Hooray! So glad that you love it. <3 Yes, next time you can add a little alkanet root powder, or even hibiscus flower powder. Those will both add a pink tone. Happy DIYing...and thanks for stopping by and giving this a try.
Hi! Is it okay to make a double batch to avoid having to make the foundation very often? Will it keep for a month or so?
Thanks!
I don’t think it would be a problem, Elizabeth. 🙂
Hi!
This recipe looks great! I have a question thought and i hope u could answer… for me
Cause i have some deep skin marks i need sth like a pancake consistency to fill in the “gups” do u know how can i do that?
Thanks in advance 🙂
Hi Andria! Unfortunately, I’m not sure this is the right recipe for you. This foundation is meant to be thin and have a light coverage. I’m so sorry, I wish we had an answer for you! I hope you find what you’re looking for 🙂
Well I made this and it look beautiful but it is SUPER oily. I can’t even keep it on my skin it feels so heavy and I feel like my skin is suffocating. Is there anyway to fix it? Also did I add too much vitamin E? I don’t have a measuring spoon for 1/8 t.
Author
Hi there. Did you use the same ingredients in the same ratios as I have listed here? That’s my first question. Second…a tip…you do not need a lot of this. Just a thin layer will do! Also, yes…it will feel different than your typical foundation. You need to ‘set’ and ‘finish’ it with your powder of choice. My DIY powder is the *perfect* compliment (learn to DIY the facial powder here, or let me DIY it for you here). Definitely apply a thin layer with a sponge, let it sink in, and then apply a thin layer of a healthy powder over top.
I used arrowroot to set it (my foundation turned out too dark)
Author
Yup, you need the zinc. It gives a great deal of color (lightening color) that is absolutely necessary. You can get a small amount of non-nano zinc oxide from me, if you’d like to try again.
I made this twice, both times using jojoba oil as a carrier. I reduced the jojoba oil by 1/3 because I wanted a more solid and less oily finished product. The first time I liked the foundation but my cinnamon is not evenly ground and contains grit. I had to throw it all out! In my second batch I used a pinch of turmeric (1/16th of a tsp for a half batch) in place of the cinnamon. Turmeric is very yellow and a little goes a long way. This second try started out a great color, but in just a few days it’s turning green! Clearly oxidizing from the top down. I store it in a 4 oz jar with a lid. Has anyone experienced this and can it be prevented? More vitamin E maybe? I also made a full batch with no zinc or spices. I love this base as a moisturizer. Thanks for posting the recipe.
Hi Monica!
I’m sorry for your loss of so much product here! I actually don’t think spices are good for makeup because they can not only irritate but they are not finely ground for cosmetic use, they don’t provide opaque color, or coverage. Zinc alone can be a bit grey looking too. If you wear mineral makeup, add a good amount (I am talking the whole jar or at least half unless you half this recipe) to the base oils and wax. I did this and added a little arrowroot and it works out nicely with some real coverage and isn’t too oily looking. It does still need to be set. I hope this helps!
Hi ,
How long the Vitamin E will preserve this foundation? Can I add some essential oils for fragrance? How many drops of essential oil needed for 4 oz?
I’m very excited to try this one.
Thanks for share.
Super nice post!! Today I came back few times to this post because it’s just so cool and I cant wait to make it my self.
But I see that your color (the cocoa color) is too… brown, for me, I think. I’m Asian and I have yellowish tone skin. So can I substitute the cacao powder (or add) with french green clay or ginger?
Author
Thank you. 🙂
Actually, looks are deceiving for this recipe. It does appear dark, but does not go on as dark as it appears. You can play with the ratios as you create, which is the nice thing about this DIY foundation recipe. Also, yes…feel free to add in a pinch or two of ginger. I would not totally leave out the cacao though…it would not turn out. Happy DIYing!
Made this and it looked like a had smeared Crisco o. My face. Extremely greasy, which is probably to wear ar night for night cream. Great ingredients, but anything with that much butter in it is going to look – well, buttery! Any tips for making it less greasy?
Author
Thanks for your feedback. You might need to increase the amount of cocao powder. You could consider using a different carrier oil, too. Also, it is imperative that you allow time for the light coverage foundation to soak in a bit. THEN…apply your healthy powder of choice over top…this part is *crucial* to perfectly ‘set’ and ‘finish’ your new look. Here is my DIY facial powder recipe (or you can buy it in my organic skincare shop here).
I do not find this greasy, at all. But, then again…I’m a huge proponent of the oil cleansing method and keeping my skin fresh and clean through natural methods like this. With facial powder over top I LOVE this recipe, as do many other DIYers and customers, too.
Hi,
I’m impressed about your DIY Products.
I’m going to try the homemade foundation. I bought all ingredients. But for beeswax I didn’t get organic. It contains petroleum jelly. Could it be work for the foundation? Awaiting for your reply.
Author
Hi Jasmine. Hmmmm, I have never heard of a beeswax that contains petroleum jelly. Honestly, I would not use that for this recipe, or use it at all. So sorry to be the bearer of bad news. :/ You want pure beeswax…organic is best, but at least get a beeswax that has nothing else in it.
So mine was way too oily! maybe this was because i used arrowroot instead of zinc oxide, and i did not have almond oil so i tried both coconut and olive, which i know are not ideal but i couldn’t get almond at that time. It seemed to work other than that it made my face like a mirror! i was wondering if anyone else has had this problem? it could have been that my scale was off too, so maybe if i fix those things it would work. Thanks xx
Author
Hi there. Zinc oxide is *crucial* for this recipe. Also, using a different carrier oil will definitely give you a totally different feel to the foundation. I would not use coconut oil, as it is a more ‘solid’ carrier oil. You can learn more about carrier oils here. Again, the zinc oxide is a must for this recipe.
I made this last night! I turned out amazing! I also make blush too using the same recipe, except that I used beet powder. Thank you so much for this recipe!
Author
<3 So glad you love it, Lily! The blush is a great idea. Yay for healthy DIYing!!!
Have you made my accompanying DIY facial powder yet? I think you’ll LOVE it, too. It beautifully finishes your new light coverage foundation, as it gives additional color and coverage and ‘sets’ the foundation perfectly.
Pretty cool recipe. But I’m curious how this works for people with oily skin? All that oil on my face seems like breakout waiting to happen. I can barely use most moisturizers. Any suggestions for ingredients for people with oily skin??
Hi Danielle, I personally have oily zones and love using this foundation *with* the powder. I have also learned that oil doesn’t cause breakouts – in fact, many oils cleanse and purify.
My suggestion is to try this toner under the foundation: http://www.scratchmommy.com/3-ingredient-diy-rosemary-cedarwood-facial-toner/
And this powder over it: http://www.scratchmommy.com/diy-organic-facial-powder-recipe/
Hi Jessica,
could you tell me how to make cocoa, nutmeg and cinnamon powder really fine?
I mixed the powders straight out of packaging and the finished mixture is gritty, so I try to put the powders through a grinder [using a magic bullet function], and they are still gritty 🙁
Would buying a separate spice or coffee grinder help? Or do I need to find a particular supplier that sells really fine powders for this purpose? I am in Australia, things are often harder to find here.
I haven’t had any success with both the foundation powders and liquids.
Many many thanks for your help in advance 🙂
Kathy
Author
Hi Kathy. Thanks for your note. Hmmm, it does sound like your raw materials are not as finely ground as mine. :/ For the DIY facial powder recipe, I do run everything through a coffee grinder. You will want to do this, for sure. Perhaps you should try this with the foundation powders, too.
Also to consider…when whisking and stirring your foundation you might let things settle to the bottom, as you will never get all of your powders to fully dissolve. So, stir, stir, stir…then wait…then pour.
I hope this helps. Happy DIYing!
Love this foundation. Mine might be off a bit. I need to get an electronic scale, mine was not electronic so the Shea and cocoa butter may have been off. I have extremely oily skin, nothing has worked to keep the oil at bay until now! I def love it but cannot touch my face during the day because it will smear…..also didn’t feel I could get my true match but it absorbs into tour skin that it’s ok and the powder makes it so Mich better!
I’ve seen you’ve answered the question about not using coca butter for someone who is allergic to all chocolate, but I’ve not seen any suggestion as to what to substitute for the cocoa powder. Would more cinnamon or possibly nutmeg work?
Love you your site!
Hi Cindy! Cinnamon might be irritating for some, but could definitely work as far as color goes. Nutmeg would work too, and would be more gentle. Please let us know if you try it out, how it works for you!
Jessica,
Good morning, and I wanted to tell you what a blessing you have been to me. I have been battling exzema issues for the last few years on my eye lids which has made it rather difficult in the makeup department. God knows I love make up so it has truly been a pain. I have tried most every make up I could think of and still most everything breaks me out.
I don’t want to sound like I’m complaining, because truly this is so minor. Anyways, I have tried multiple diy recipes as well, and truthfully been a little discouraged. The first time I made your recipe for foundation I used the zinc oxide which I found at my local drug store that was more like a lotion consistency. I tried this 2 times and it was sludge. Yuck! Lol then I bought some online that was powder form and for a week I’ve been using your foundation and powder recipe. I really like both recipes. I do wish it had a little more coverage, but heck beggars can’t be choosers.lol
. I wanted to tell you, thank you so much for posting these! What a blessing you’ve been to me! I made your sunscreen recipe as well, and look forward to using it!
My only question is have you had any luck with the eye shadows or mascara recipes? I’ve tried some on line and truthfully have they haven’t been worth a nickel.lol anyways thanks dear! I appreciate you!
Julie
With your permission I am sharing a few DIY on my blog. love ur shop. I shall try and will encourage my bloggers too. Thank u so much. For going green 🙂 and helping us too.
I am allergic to Cocoa is their anything else i can use.
Author
Absolutely, try shea butter! We have a great post that talks about different butters you can use in DIYs. You might check it out, too. 🙂
I’m extremely exited to try this!! It sounds and looks absolutely amazing!
I refuse to wear foundation because of the horrible chemicals! But this is sounding like a perfect alternative!!! I’m so excited!!
However, I am allergic to almonds and was wondering if I purchase this from you, if you would be willing to tailor it for me?? I am redheaded and my freckled skin is just so light!!
Thanks for making such a fantastic healthy make-up!
Hi Tessa! I love how excited you are! You could definitely sub another carrier oil for the almond oil. We have an informative post about choosing carrier oils to help you find which would be best for your skin. I hope this helps you 😊
This stuff is amazing – provides beautifully light coverage. I follow it up with a light dusting of DIY translucent powder and I am so happy with the results. It has been a long journey for me making the switch from store bought cosmetics to DIY. A lot of ingredients were purchased, then a decent scale, lots of research and then many, many hours of experimenting. It’s thrilling to try a recipe for the first time and have it turn out so well. This recipe is definitely a keeper, thanks so much!!!
I made this but used argan oil instead of almond oil (because I had this on hand and not almond oil. And I found really soft Shea butter on amazon with free shipping.
Thanks so much for your recipes, awesome! Love the smell from the cocoa powder and cinnamon too.
what type of foundation is this ? compact or liquid?
Author
Mmmmm, I’d say solid, yet spreadable. Definitely not a liquid. Hope this helps. 🙂
Amazing idea and recipe!! I have a question… My pores clog really easily as I am 18, what could I use place of the wax? Thanks!! I will most likely make this as soon as I have all the ingredients!!
Author
Hi there. You could try another type of wax (a vegetable wax), but the wax really is necessary for this recipe to properly set up. Happy DIYing!
Hi. I live in the UK…I’m trying to buy the zinc oxide but I can’t find a retailer in the UK that sells the kind you suggest. Can you help?
Hi there! We sell non-nano zinc oxide in the shop! We also ship worldwide 😊 I hope this helps you!
Hello there, I don’t know whether this was asked before but would the dark shade work for an African-American skintone or should I ask more cocoa powder? Also can I use other oils instead of almond oil?
Author
Hi Simone,
Yes, Yes, Yes! That’s the nice thing about this light coverage foundation…you can create it to suit your own skin tone. Yes, you can also sub in any other liquid carrier oil. You might get some inspiration from this post on our site. Happy DIYing!
Hi Jessica
Thank you so much for your post – I have been looking for a while now for some make-up that is completely natural and I really don’t think it exists!! So decided to make my own and found this blog! I just have a quick question – I am vegan so don’t use beeswax – what could I use as a replacement?
Many thanks,
Bianca
Author
Hi Bianca,
Great question…you can try carnauba wax, although I haven’t personally worked with it. I do know it is a bit more hard than beeswax, so you might go a little light at first (maybe leave out 1/4) and see how it sets up. You can always melt it back down over a double boiler and add things as needed. Happy DIYing!
I followed your recipe and have found that although this feels and smells delicious, it is not staying on my skin and instead is leaving it looking really dirty and grimy. When I first apply it looks fine, nowhere near as much coverage as I’m used to but it’s ok. If I try and put a powder (I tried yours and a couple of others) over the top then the foundation literally wipes off in places, and if I leave it it’s ok for only half an hour before also leaving me looking streaky and dirty. Any tips?
Author
Hi Anna,
Hmmmmmm…let me brainstorm here. Are you using a fair amount of foundation? Since it is light coverage, I’ve had people try to apply more than necessary, as they feel as though they want more coverage. That won’t help…in fact, it will be too thick then (and lead to streaks with powder, esp if powder is applied before the foundation has soaked in). Which leads me to my next thought…are you leaving time for the foundation to soak in before applying powder over top? That’s important, as it would definitely lead to streaking and heavy applications in places of the powder over the wet foundation. Make sure you apply a light layer of foundation and powder (after the foundation has had a chance to soak in). I hope this helps. Happy and healthy DIYing!
Hello! I am verry excited about this recipe and i cannot wait to try it. I have two questions though: 1. Could I use cocoa butter instead of shea butter? 2. Could I add a few drops of an essential oil so as to also hepl my skin while using makeup? Thanks! oh and can I use coconut oil instead of almond?
Author
Hello!
Cocoa butter- yes
EOs- yes
Coconut oil- mmmmm, probably not. :/ It’s a thick carrier oil and will definitely change the texture. That said, you can certainly try it! Just expect the consistency to be more thick (and this is already a thick consistency foundation). If you try it, let us know, please. 🙂 Happy DIYing!!!
Love your web site. Can’t wait to try your recipe for foundation and powder. I have extremely sensitive skin. The makeup in stores, expensive or the so called pure kind makes me itch and burn, there are so many chemicals in it. I am vegan and would like to know if there is another type of wax I could use instead of beeswax, candelilla or carnauba or something else vegan? Thank You for publishing your recipe.
Author
Thanks for your kind words! <3
Honestly, the only other two (besides beeswax) I know of (and haven't used myself) are candelilla or carnauba. Sorry I can't be more help here!
Hi there!
I currently don’t have any shea butter for your liquid foundation recipe….could I substitute it with mango butter?
Thanks!
Author
Yes, for sure! That should work nicely. 🙂
Mam I am Indian, can I use kokum butter sesame oil for this foundation cream
Sure! You can learn more about carrier oils here and butters here. Happy DIYing!
I am just wondering, can I use dutch processed organic cocoa powder? Or does it have to be cacao powder?
Hi Samantha! We have had some people tell us that using cocoa powder turned their foundation purple! We suggest using cacao powder so you don’t run into the same issues. Happy DIYing 😊
Hello. I was wondering if the Zinc is necessary or just to add the SPF? Will it effect the final consistency if left out? Thank you 🙂
Author
It will definitely affect the consistency if left out. :/ Sorry!
I think a few people have tried arrowroot…you could give that a shot.
Hi Jessica. I am african-american with a light to medium complexion a yellow undertone; It has always been a challenge to match my color with store bought makeup. Can I modify the coloring with tumeric?
Hi Clair! Give it a go! We have never tried to use turmeric to modify the color shades. Come back and let us know how it worked for you! 😊
Love this! I’m really into DIY stuff. Ive made my own toothpaste, face wash, deodorant, shampoo, and hand soap. I LOVE anything and everything that’s homemade. I really wanted to start making my own make up, but didn’t find a recipe that I liked. I’m definitely going to try this one. Thanks so much!
Hey guys! I personally needed more coverage than the original recipe, so I decided to experiment. 😀
What I found to work is adding a lot more white powder (I used a mixture of arrowroot and zinc oxide – adding more zinc also increases the sun protection, which I also personally need). You would have to change up the amount of colored powders, but I found I had to just do that anyway (I’m very pale, so the lightest shade here didn’t work for me. :D).
Anyway, the added powder adds more coverage! I have found that for it to spread well I do need moisturizer underneath (as it’s not quite as oily anymore). I personally like having well moisturized skin, so this wasn’t a problem for me. I’m sorry I don’t remember the amount of extra powder I added, but you could always adjust it to suit the coverage you want. 🙂
I hope someone finds that helpful! 🙂
Thanks for a great recipe – quick question about cinnamon. I read that high grade Ceylon cinnamon has more essential oils in it that can irritate skin – did you use cassia or ceylon variety for this recipe? Thank you in advance !
Great question! We use the cassia variety in powder form for this recipe. Happy DIYing 😊
Thank you for recipe. I tried this recipe but left out the zinc oxide as I don’t really want sunscreen protection. In doing so, I think the difference is that there is virtually zero opacity in this which I don’t like. Soooo, it looks like this is a vital ingredient in order to have some coverage. Would you agree?
Author
Hi Lisa.
Yes, it is vital, for sure. Vital in terms of both color and consistency.
I followed the recipe to the letter and the zinc oxide didn’t do much more as far as color or consistency. I put on as I would a regular foundation make up and it was too heavy for me. If you put it on like a moisturizer and rub in well, then it’s nice and essentially acts as my morning moisturizer. I think the powder is the big star though with regard to getting my desired coverage. I did notice that after a day or two, the shea did its gritty thing on me (arghhh). Thanks for recipe and sharing.
I have been using the foundation and setting powder for two days now and I can’t say WOW enough! My skin is 46 years old and I have tried over 100 different foundations and powders over my lifetime ranging from the expensive brands to the cheap brands to the “natural” brands and I have finally found THE perfect product. I cannot thank you enough for making your wonderful makeup and also for putting your recipes on-line. The foundation coverage is light, smells fantastic, and the powder sets it perfectly. I am trying it today without moisturizer and remain amazed at the coverage and hydration. THANK YOU!!!!!!! You have gained a customer for life!
Is there a particular type of moisturizer and/or primer to be used underneath this for those of us with very dry/eczema-prone skin? I’m guessing something oil-based, perhaps, to match the oils in the foundation ingredients?
Author
Hi Morley,
Fantabulous question. I actually find no need for a moisturizer when I use my foundation and I’ve heard the same from many others. This foundation is three-fold: moisturizer, sun protectant, and color base…all in one! Of course, try it out and see what you think, but I think you’ll find no need for an additional moisturizer. Happy DIYing!
I don’t usually comment on pages but I just wanted to say. You seem like a really good person. Showing people how to make their own as an option instead of just selling the product and not the secret. That alone makes me want to buy from you and support your business instead of just taking the recipe for free. If only everyone was like you!
Author
<3 This is one of the nicest comments I've ever received here on the site. Thank you so much for taking the time to write it…reading it just made my morning. I love helping out the DIYers with recipes and ideas, but also love making them…so it just turned into a way for me to help the DIYers and the non-DIYers by offering them for sale, too. I like creating win-wins in life.
Thank you so much for your kind words, Penny. 🙂
Hello! This post really inspired me to try and make something similar. I just want to add more skin care to it to make it a sort of “all in one, good for the skin” cream with a bit of tint. My two big questions, are how do you feel about iron oxide pigments? In your opinion are they safe? And also, would it be possible to use something like raspberry seed oil or carrot oil instead of the zinc oxide for the SPF or should I stick to the zinc oxide? The only problem I foresee with that is it would change the texture, so I was thinking of adding goats milk powder for added skin benefits, but also as a powder to thicken it. Sorry for the long post, I’m just really curious what you’d sayXD
Author
Hi Rachel!
A *true* DIYer at heart…I love it! Gosh…you are asking some great questions, but until I would actually try some of them myself, I can’t really say, especially about replacing the zinc with goat’s milk. I am guessing that it would affect the consistency, and I don’t know about the shelf life of goat’s milk powder either.
I can speak to your question about oxides. I am a-okay with oxides and use them in some of my own creations (recipes will be coming!). I don’t care for micas, so I’d stick to oxides. I can tell you that you would need *way* less oxide powder than cacao powder, so again…that would affect the consistency.
Honestly, you have some great ideas…but I simply can’t advise on them, as I haven’t tried them. If you do try any of them, make sure you write down your measurements as you play! That is crucial when DIYing so you can learn what worked and what didn’t. Also, please report back with any ideas you try and their results!
Happy DIYing!!! 🙂
This inspired me to try to make my own version where I want to add more skin care benefits to this so it’s mostly a “good for the skin” lotion with a little bit of tint. The problem I’m having though is that I never seem to be able to make the cocoa powder look natural on me. (I don’t know what I’m doing wrong DX) I’m thinking of trying to mix my own color using iron oxides and even though I’ve done a lot of my own research I was wondering what your opinion is on those and whether you think they are safe or not. Thank you!!
Hi Rachel! We have never played with iron oxides in this recipe! Give it a go and let us know what you think of them 😊
I noticed there is yellow and white organic beeswax. Does it matter which one to order? And I read that using silk powder helps make it silky and most cosmetic s use this ingredient. Do you know of a way to incorporate that into the foundation and powder?
Author
Hi Melanie! You can learn more about beeswax in the post below, but the short answer is that you want yellow.
http://www.scratchmommy.com/tools-ingredientsto-diy-your-own-scratch-mommy-skincare-goodies/
As for powdered silk, I do not use it. You can learn more from the EWG database here…
http://www.ewg.org/skindeep/ingredient/705939/SILK_POWDER/#
Hope this helps! 🙂
I just made this today and I am thrilled! I used Jojoba as my carrier oil. I just kept adding cacao powder until I had a good match. I put the foundation on and finished it with my Hourglass Dim Light Ambient Lighting powder and it looks great. As close to a “no makeup” look as I have found. Thanks for sharing this recipe.
Author
Hooray! So glad that you like it, too. 🙂 You’ll have to give my powder recipe a try next…
http://www.scratchmommy.com/diy-organic-facial-powder-recipe/
Thanks for the feedback, Tracey!
Quick question!
I am looking for a liquid foundation that is NOT waterproof, and was hoping this would be one. i have tried researching all the ingredients but have come to brick walls. i was hoping you would have the answer! if it is not, do you know of a way i could change it up a bit to make it not waterproof!
Author
Hi Faiza! Hmmmmm, NOT waterproof? Well, you must add the beeswax to this recipe, as that gives it staying power and is crucial to getting the proper consistency. Although the beeswax gives it a bit of a waterproofing factor, I wouldn’t call the recipe ‘waterproof’, as it will come off with water and a washcloth (soap helps, obviously, too). I’m not sure if this helps or not! :/
Hi Jessica! I just discovered your blog and I am so excited to try this foundation & powder! I would love to see recipes for your bronzer & blush too, pretty please? 🙂 It’s nice to be able to make your own healthy makeup instead of paying outrageous prices for pretend healthy makeup. Thank you!
Author
<3 Thanks for your kind words, Hannah.
Make sure you have subscribed to our newsletter...bronzer AND blush will be coming in the next month or two!
You can subscribe in the sidebar (bottom of this page on a phone). Happy DIYing!!!
Is there a way to make this foundation less oily? I find it is too oily when it is applied for my liking? I really love the fact that I have made it myself but would love it even more if I could make it a little less oily. What could I add to lessen the oily look when applied?
Thanks 🙂
Author
Great question! Are you applying a powder to set and finish? I find that with a quality powder over top (& applied a few minutes after the foundation soaks in) I’m good to go.
You can find my powder recipe here. Just type facial powder into the search bar at the top of the site. Let me know if this feedback helps. 🙂
Hello! This foundation looks absolutely lovely, and I have nearly all the ingredients for it, but I am curious as to how much it makes? Both the jelly jars and the tins you linked are 8 ounces. Will it fill an 8 ounce container?
Thanks so much!
Author
The way the recipe is written, it makes approximately 5oz.
Hi! I’m really happy to have found this blog! I’ve tried a couple of diy powders similar yours and gave been looking for a good foundation/bb cream recipe! There’s one problem…and that is that I live in Vietnam. I’ve found zinc cream just about everywhere, but no one seems to know where to get zinc oxide powder. There are a couple of all natural baby creams available here with zinc oxide and cocoa butter together. Do you think this could be a suitable substitute? Thanks so much!
Author
Hi! Hmmmmm, that’s a tough one. :/ Since I don’t know all of the ingredients in those products, I really can’t say. Some people have added in extra arrowroot (in place of zinc), but I have not done that myself, so cannot guide you in that substitution.
I do ship small amounts of zinc, if that might help. …and I do ship around the world. You can see the listing in my skincare shop here on the site. Hope this helps! 🙂
I want to try out this DIY recipe yet I do not have a scale , can I make this by converting ounces / oz into Tbls/ tablespoons and tsp/ teaspoons ? An example would be 1 oz shea butter would = 2 Tbls. Or 1.5 oz almond oil would be 3 Tbls. Thanks .
Hi Joyce! Yes, this recipe works converted into tbs and tsp! Happy DIYing 😊
How many oz of foundation does this make?
How many ounces does this recipe make?
Author
This recipe makes approximately 5oz of foundation.
This is really ambitious! I’ve been using Beautycounter’s Tint Skin tinted moisturizer and it works great and each ingredient has been screened for safety. I have a question, how do you prevent inhalation of the zinc oxide? I know it’s safe when it’s in a product, but is unsafe to randomly inhale.
Author
Hi! Great comment and question. As I suggest with my DIY sunscreen recipe, using a face mask is a great idea. I will update this recipe to include that information, as I didn’t realize I didn’t include that. Thank you!
I made this foundation but it is really hard. It does not spread well at all. I was wondering if you knew why it did that, did I do something wrong? I am at 7000 ft elevation would that have anything to do with it?
Author
Interesting! Well, I honestly don’t know much about elevation changes for recipes (I’m in Indiana), but it sounds to me like it might have a little extra cocoa butter? Perhaps add a bit more oil. You can simply melt it down and add in more oil. Hope that helps!
I love this recipe! I use this as a base and use a homemade powder on top. It is very moisturizing and makes my skin glow. I also had the same issue as Selah. I keep getting little clumps in my foundation, which go away when I spread the foundation on my face. I am definitely going to try whisking the foundation. Thanks Selah for the tip! And thanks Jess for this amazing recipe!
Thank you for this recipe, I can’t wait to try it! Just a quick question about the color. I noticed the foundation in the photos is a lot darker than your skin tone — is this something I should be aiming for? In other words, does it appear darker in the tin than it does on your face, or did you just make a darker color than usual for the post?
Author
Hi! Yes, it does appear a bit darker in the container than it appears on your skin.
Hi! I was wondering if adding arrowroot to this recipe would give greater coverage? (As it would be thicker) You would of course have to adjust the amount of cocoa powder, but do you think it would work? Thanks!
Hi Jessica! I would like to make this foundation!
In your recipe , 1.5 oz Cocoa Butter,1.5 oz Beeswax, 1.5 oz Zinc Oxide OR 5 oz?
Author
Hi Sara!
.5oz Cocoa Butter
.5oz Beeswax
.5oz Zinc Oxide
They are all .5oz. Hope this helps. Happy DIYing!
Thank you your answer!
But why is point before 5? I believed you left 1! (1.5)
So In this recipe are 140 gr cocoa butter, 140 gr beeswax, 140 gr zinc oxide!
(Sorry if I am ask too much, but I am not English)
🙂
perhaps you have already received an answer to this, but the . signifies half. .5 is equal to 1/2 ounce.
I am SO excited to get my make up! I ordered it from your shop last night!!! I have very fair skin and went with the light, do you think that will be a good choice for me?
I also bought all of the prouduct from Amazon to make the powder. Cant wait for that to arrive!!!
Hello!
I would like to know if you have a foundation that contains other oils apart from almond oil. I am allergic to almonds and I do not think it wise to apply almond-based products on my skin.
Thanks!
Author
Sure! You can substitute any other liquid carrier oil in place of almond oil. 🙂
I made your foundation today but accidentally used avocado oil instead of almond oil. I think it will just add a little more fat into the makeup which I think will be good due to the windy, cold months that lie ahead. I think it seemed a little light and purplish but once I put it on and topped it with my homemade powder foundation it looks great. I think next time I will probably add a little bit more cocoa. It’s so light anyway I think I’ll make due and let my powder handle the main color. I will be using your recipe again, thanks!
Do you know if any one has used the foundation on rosacea and what the results were?
Author
I have a touch of rosacea and with my DIY powder recipe over top it blends in nicely. Hope this helps!
Patiently waiting for concealer recipe :)) I’ve been trying everything and can’t seem to get it right.
Author
soon, Soon, SOON! 😉
Love, love, LOVE you’re website!! I don’t know how I haven’t stumbled upon it sooner! DIY makeup has been on my to do list forever and I’ve just been going without for the most part. I just made this foundation and I’m in love! Next up is the powder!
Also holding my breath for a DIY concealer recipe!! It’s my ‘wouldn’t leave the house without’ makeup staple!
This looks fantastic. Good work and thanks for all the photos!
You mentioned at the end of the post about an upcoming recipe for facial powder. Has that been posted yet?
Author
Hi! Yes, it sure has. You can find it here…
http://www.scratchmommy.com/diy-organic-facial-powder-recipe/
Hi! I just made your amazing foundation. But had a lot of trouble with the measurements. Let me start by saying I was always horrible with math.. And .5oz through me for a loop on the digital scale. Wasn’t sure if .5 was read as 0.05 or 0.50 on the scale. Safe to say it didn’t come out so thick.. But the color came out great. So hoping you could help me out!! Thanks 🙂
Hi!
Just wondering if I can use Shea Oil instead of Shea Butter or if there is even a difference??? Thanks!
Hi Amy! We have never played with Shea oil over here at Pronounce. From what we’ve researched it looks like Shea oil is a carrier oil not a butter. That said, my guess would be that since it is an oil it would not set up the same as if you were to use the Shea butter. If you wish to experiment and try it out, come back and let us know how it goes! Happy DIYing 😊
This is a brilliant idea, I’ve been having so much trouble with my skin and have become quite self aware about what goes on and in my body, so I’m loving this product. In your shop, you’re selling this foundation in Light, Medium, Dark. I’m a fairly dark person, I’m African, probably a milk chocolate skin color and I need to know if you think you’re dark will be dark enough for me, because I really want to buy like 10 of the 4oz Dark as a bulk once I’ve tested it and if it suites me
Author
Hi Shantel,
First…thank you. <3 I love creating non-toxic solutions like this. Second, yes...I believe that dark would be a good fit. Remember, this is a light coverage foundation, so really, your choice of finishing powder is of utmost importance, as it will 'set' and 'finish' your new look perfectly. Let me know if you have other questions. 🙂
Can you provide measurements instead of weights for the ingredients?
Hi! I made some of this foundation yesterday, but I think I have a few problems.
1: It is not almost rock solid. I didn’t put it in the fridge or anything, but it has gone very hard. I can still apply it by rubbing my finger in it to warm it up a little, but the hardness is annoying. Can you think of why it would be so solid?
2: It is VERY oily. When I put it on, my face looks like it’s wet. I made some powder, and with that over the top it’s fine, but I prefer the dewy look. Is it usually this oily?
Thanks for the great recipe; I love it even if it doesn’t work quite right yet. 😀
Also, how on earth did you get it to go into the container so smoothly? Mine just looks like a pile of mud. 😀
Sorry, don’t know why there is a “not” in the first sentence of the first problem. What I meant was that it has “gone” almost rock solid. 😀
Okay, I know why it’s gone so hard – I used Coconut Oil, which of course goes solid in cold temperatures. (It’s just coming out of Winter here in New Zealand) I will see if I can tweak future recipes a bit so it goes softer. 🙂
Author
Ahhhh, yes. That is definitely the issue. In my recipe I use a liquid carrier oil. You can certainly substitute the almond oil I suggest with another liquid carrier oil (jojoba, apricot, etc), but using coconut oil (the kind that is ‘solid’ until it hits appx. 76 degrees) would definitely change the consistency of this product. You can always melt it back down in a double-boiler and add a bit of liquid carrier oil (shouldn’t take much for the recipe amounts above…perhaps couple of tablespoons) to get a consistency more like mine.
I intend to get some Almond Oil for some other recipes, so next time I will just use that like the recipe says to. 😀
I have another question: my foundation is quite lumpy. Very small lumps, like sand. It rubs in fine, but it’s not exactly comfortable… Do you have any idea of what would cause this?
Fixed it! I know that Coconut Oil can be beaten to make it fluffy and not hard in cold temperatures, so I experimented to see if the same thing worked on this foundation. It didn’t go fluffy like whipped cream, but it definitely got rid of the majority of the grittiness and it is a bit softer too. (I left it overnight to make sure) Very happy! 😀
Thanks God u shared ur comments! I added coconut oil too and then i added more almond oil cuz i thought it was going hard cuz of the lots of cacao Powder i had to add. Then it became gritty. Do u have white particles too? Like prob he zinc oxide maybe? Cuz i got that and its annoying me.
I have little whitish almost clear rectangular flecks in mine. Not sire what it is…..I melted all first five ingredients…..
This is probably a silly question (and forgive me if it was addressed in the comments already, didn’t have time to check, so sorry!) Your link for beeswax takes you to a bar of wax. Do you use the bar or the pastilles shown below the bar? If you use the bar, how do you measure 0.5 oz to use in the foundation?
Author
Hello Liz! So sorry for my delayed response. Yes, you can use beeswax pastilles or the bar of beeswax. I use a cheese grater over a bowl to measure out when I’m using a bar. A simply cheese grater like this – http://amzn.to/1pWkTXt – works perfectly. Now, just know that you won’t really want to use it for anything else (food-wise), unless you reeeeally give it a good scrub. I just keep one for food and one for DIYs. Thankfully, they are affordable. Happy DIYing!
U know what else can grate the beeswax? Potato and carrot peeler!! When i did that a few nights ago i was like, why didnt i think of that! Cuz its so much fasterr and easier than a grater (which i did the first few times hahaha)
Can you use regular cocoa that is used for baking? What is the difference between what you use and the one from the store in the baking aisle?
Author
Great question! Yes, you can use cocoa, but I prefer cocao (also used for baking, not just my DIYs). Cocoa powder is raw cacao, but it has been roasted at super high temperatures, which actually alters the molecular structure of the cocoa bean. This decreases the enzyme content and drastically lowers the overall nutritional value. So, while you can use cocoa, I use cocao for everything in my home. Hope this helps. Happy DIYing!
Hi! I’m so excited to have found this recipe! I’m wondering if there is a substitute for almond oil bc I’m alergic to almonds.
Thanks,
Kori:)
Author
Hi there. Yes, Yes, YES! Any liquid carrier oil would be great. You can use the link above for almond oil to see a plethora of other available oils…avocado, jojoba, apricot, etc. Happy DIYing!
Hi! I have everything at hand but the cocoa butter, do you think I can get away with it? What ratio do you recommend? I can have plenty of all other ingredients so, do you have any guidance for me pleaaase?
Hi there!
Great question. My gut says yes, go for it and use shea butter in place of the cocoa butter. That said, I haven’t tried it myself, so I can’t make any promises. The cocoa butter is slightly more firm than shea butter, so you’ll have a bit different texture, but I don’t think that’s necessarily a bad thing. You also won’t have that cocoa butter smell, but that’s a small thing, I guess.
If you try it, let me know! I’m sure other readers would love to know, too.
Happy DIYing!
Jess
Yeah i didnt have cacao butter either so i added coconut oil and up the beeswax. Turned out great. But now i think i went overboard with the cacao Powder 🙁
I made this yesterday and came back to comment. My face has never felt so velvety! I am using it in place of my regular moisturizer (also DIY/natural) and this feels amazing. It took much more cocoa powder than I expected to get a color I liked – and it’s much, much darker in the container than my skin – but it looks great on. I may play a little with the consistency, it’s fairly solid at room temp which makes it a little tricky to go on, and takes probably an hour to really soak in. It doesn’t look shiny, though, so I don’t mind (I just look “dewy”). I put some on yesterday when I made it and my skin still felt amazing this morning. Will definitely be checking out your other recipes! Thank you 🙂
Hi! I don’t think I’ve ever seen a foundation DIY that looked as good as this one. However, do you have any suggestions to make it for darker skin colors? I feel like adding more cocoa powder would work but I don’t want to throw anything off balance.
Hi Jess, I made your recipe a week ago and tweaked the oils/butters to suit my needs. I LOVE its texture and coverage! My skin is so soft and I cant even tell Im wearing makeup! I had to add more cocoa powder even though I am very fair skinned because it was very light on me. I used titanium dioxide instead of zinc oxide though because its what I had on hand. Do you think that is why is it so light? I have never used zinc oxide before so I am not sure how it behaves. Titanium does make things very light. What do you think?
Yay! Glad you are loving it, too. 🙂
It is a light coverage foundation recipe. Your powder will ‘set’ and ‘finish’ it with added color and to give it a more matte look. That said, yes…just add more cocao powder until you like the color and it’s a better match. Hope this helps. 🙂
Can the zinc oxide be left out without affecting the foundation? i just don’t want the sunscreen in my foundation. Thank you, Wendy
Obviously, I did something wrong because my foundation came out too hard. I was thinking about remelting it, and adding more of something to make it softer. Do you think more almond oil might do it? Thanks so much. I can really tell I’m going to love this, if I can just make it easier to apply.
Hi there!
Bummer!! Sure, just melt it down and then add a bit more oil. That should get you the consistency you desire.
Enjoy your new healthy foundation! 😀
Mine started out lovely and creamy. I have it in a glass container in the bathroom (with lid). After a couple weeks, it’s as if the beeswax has hardened independently and I now have small beads of beeswax. Initially I used a cosmetic sponge but now I must use my fingers and warm it up in order to get it on but still have bits of beeswax that fall off. Can I remelt? Any other suggestions?
Author
How interesting, Janelle! I have never had a batch do that before. Did you use the exact ingredients I use in the recipe (did you sub anything)? Same amounts of the ingredients?
You can definitely remelt and repour, but I’m not sure why the beeswax would separate…I’m baffled! If you do remelt it I’d love an update on how it’s doing.
Hi Jess. I found your blog and foundation recipe through a link from livesimply.me, and I was really excited to try the foundation. I’m really new to DIY cosmetics but i went a bit mad on the weekend, also making lotion, body butter and face powder.
I have oily but sensitive skin, and i also struggle to find the right shade of foundation, even when i can find a brand that doesn’t make me break out. So I made your foundation last night, but the colour is a bit weird – it came out kinda greyish-purple, i think because of the zinc oxide powder? (next time i will definitely use less!) I’m half puerto-rican; my skin isn’t particularly dark (and it is currently winter here in New Zealand), but definitely more yellow/gold tones rather than rosy. Anyways, I need to tweak the colour a lot more to get it right, and was thinking of trying nutmeg and ginger. Is it ok for me to re-melt the foundation and add more spices? In what quantity would you recommend, and are there other spices i could try to get more golden tones?
Colour aside, I’m pleased to notice that my oily skin is noticeably less oily today, which is a minor miracle in itself. I think this foundation will be good for me, but i need some help with the colour 🙂
Thanks!
I have been looking for a good foundation recipe and this one looked amazing! I just made it and am waiting for it to cool but it looks super dark and I only put a 1/2 teaspoon of cocoa powder. Should it be dark for the light shade? Also, the cinnamon doesn’t seem to be mixing well. There were little specs of it in the mix. Is that ok?
I’m very excited to try it!
I made this about a month ago and I LOVE it. Yes, I waited a month before throwing out my store-bought foundation just to be sure I liked it. I am more brown than you but with (a lot) more cocoa powder, it matches my skin perfectly. I was a little weirded out by the color of it but I’m over that and I don’t particularly like the smell (almost over that). But regardless of those two (very small) complaints, this foundation is amazing. Ever since I have been using it, all my friends have been saying how great my skin looks. Thank you so much for the fabulous recipe. I will be making this again.
Hey, I love this website. This is good stuff. I am going to make the foundation today. Already have a powder made up, but it’s light, need more coverage. Maybe it will be fine on top of foundation though. Also, everything is homemade except my concealer, which is almost gone. Do you have a formula for concealer? I want everything to be good for my skin! Thanks for all the recipes. You are great 🙂
Can I simply just say what a comfort to uncover a person that genuinely knows what they’re talking about online.
You actually realize how to bring an issue to light
and make it important. More people need to read this and understand this side of your story.
I can’t believe you aren’t more popular because you surely possess the gift.
Wonderful post! I look forward to making it and getting away from the “icky” foundation once and for all!
Thanks for the great recipe! My skin has become really sensitive lately, and hasn’t been reacting well to the zinc oxide SPF foundation that I’ve always used (probably because the zinc oxide they use can absorb into the skin), and liquid foundations in general. I’m allergic to pretty much all sunscreens I’ve tried on my face. Then I found this. So far, it’s been perfect under powder foundation, and I love the way it moisturizers so well and adds sun protection. My only recommendation is that maybe calling it a tinted moisturizer with SPF would be more accurate. It doesn’t really give the coverage most people expect with foundation, but it’s much more moisturizing than any foundation I’ve ever tried, and for my dry skin I’ve tried a lot that claim to be moisturizing. Thanks again!
Hi Jess… Is it okay to sweat at the gym with this foundation but with no make up? I’m assuming once you sweat, your pores open and absorb all the nutrients? Which is all natural and organic products anyway. Also, will consistent use of the oils improve the blemishes on my face?
My face swells up like a balloon when I use Vitamin E. Is there another product I can use or can I just omit it all together?
This is awesome! It is easy to make at home. I am allergic to cinnamon so I left that out. I didn’t have the zinc either. So I simply omitted those steps. I have very fair skin but because I left out the cinnamon I used 1/2 T and 1t of coco powder. It looks really dark in the jar, but goes on perfect! I just love it! Then I use my powder that is made of arrowroot powder, green clay and coco powder. It’s perfect! That you so much for sharing this!
I really don’t know that we can prepare foundation at home. Thanks for sharing its recipe with us. Can i use olive oil instead of almond oil.
Yes, absolutely! You can sub in any liquid carrier oil you prefer. Happy DIYing! 🙂
Hi there. I found your link through Attainable Sustainable and I wanted to know if you also make eye shadow? I’m not much for make-up but I’d wear it if it were natural. If you don’t make any, do you know of someone who does?
Thanks. I can’t wait to try your product out!
Hi, I was wondering how I’d go about getting some zinc oxide off you? Super excited to try this recipe!
Can you please explain the zinc oxide? Why does it have to be a certain kind?
Also, is it really necessary to use beeswax, shea butter, AND cocoa butter? Why did you choose to use all three rather than just one? Would it be possible to use betonite clay instead for one of them? I’ve been looking for a foundation as well as a moisturizer sunscreen so I really want to try this, I’m just a little confused. Thank you!!
I just made this and I must have somewhat distracted because I’m not getting the right color and I realized that you said to add the zinc oxide to the mixture while measuring- I measured .5 oz of the zinc oxide and added it to the mixture. Did I completely ruin it?
I am never thought to make my own foundation. This is a simple and easy way to clean up my makeup. Thanks so much for sharing it with us at the Let’s Get Real Friday Link Party. I hope you’ll join us again this week.
Hello there! I’m from Kuala Lumpur. Was google-ing around about home made skin care and stumble upon your blog. I couldn’t be happier! 😀 I would like to ask, if I have slightly yellowish/olive skin tones, what other things I can add for the colour? Because adding more cocoa only will make it darker shades. I have tried making face powder last week, but couldn’t get my shades. I’m Southeast Asian with medium dark but yellowish. Hope you can help 🙂
Try adding in a little turmeric powder.
This is brilliant! I can’t wait to try this. How have I never even thought about making my own makeup until now!??
I just made this and I used coconut oil, but other than that, I followed the recipe perfectly. I really like the feel of it and found a good color match. However, when I put it on, it kind of just looks like an every day lotion, meaning that although I feel like I got a good color match, it didn’t seem like there was any coverage or evening of my skin tone. And sadly, it seemed like the only color that did show up was a darkening of my pores and dark spots… 🙁 I also made the powder from the site you linked and I do like that. But again, I feel like my pores and dark spots are actually darker. Is this the cocoa butter? Is there an alternative to this that might better even out my skin tones?
Hey,
I ordered the Zinc from the link you posted, and without telling me they were going to, they charged me a 20$ administrative fee, and a shipping price higher than they’d said.
I went from having a 10$ order to a 40$ order.
I suggest you find another supplier…that was an absolute ripoff.
Hi Ellie,
They do state on their website that they have a $100 minimum order total…or an administrative fee is assessed. Sorry that you missed it. It is a bummer to have that fee, I agree. :/
I actually love New Directions and have no desire to find another supplier. Their zinc oxide is the best that I have found. Plus, I purchase everything in bulk, so I always spend $100.
In the future you might try and locate another quality zinc oxide supplier (I have searched high and low, but cannot find one that I trust). Also, I can easily mail a specified amount of zinc oxide to customers, as several have inquired. Finally, another reader mentioned a person (business?) here in the comments that allegedly offers quality non-nano zinc oxide, but I have yet to contact them. Search through the comments here to find them.
I am sure you’ll love your new healthy foundation. Thanks for your note.
Jess
Bulk apothecary is another awesome supplier of ingredients and no minimum orders
I have never seen anyone make their own foundation before, this is so cool and it looks so simple to make. I was wondering if you have made it with coconut oil? Only because I love the light consistency of coconut oil for my skin.
Hello!
I can’t wait to try this out! I quickly scanned/searched the comments to see if my question was already answered, but I didn’t see it. So, I apologize if you answered this already, but do you think it would be okay to use African Shea Butter? That is what I have on hand & I’ve used it in other DIY recipes for lotions & such. Thank you for your opinion/advice!!
I cannot pin this recipe with Pinterest, please check if there is a problem with your website.
Hi Corina,
Hmmm, I’m guessing there is possibly an issue on your end, as this DIY recipe has been pinned over 7,000 times. I’m not sure what the issue could be. Sorry!
Jess
Hi Jess,
I would really love to get one of your pre-made foundations from Etsy! I’m wondering which color I should opt for, though? What’s the best way to figure out which is better for my skin tone? I have fair skin, but have been told that I should wear beige-colored foundations because they blend better with my color. Any advice?
Thanks!
Hi Sarah,
Great question. My advice is to go with your gut. If you usually purchase a foundation on the light end of the spectrum, you’d want light in mine…and so on and so forth. If you like, free free to send me a picture through an Etsy conversation of your face and I can help. Just make sure it was taken in natural light and is fairly closeup.
Best,
Jess
Hi Scratchmommy ,is the foundation very dark when you apply it?
Hi Jessica,
After I learned how toxic most conventional foundations are, I stopped wearing any foundation at all. I am so delighted to see your easy to make DIY organic foundation. I can’t wait to try it. This will go nicely with my DIY lip gloss. I am so glad you shared your lovely natural beauty recipe with us at the Healthy Happy Green and Natural Party Blog Hop! Thanks for helping us look good naturally! I appreciate it!
I’ve started dabbling in handcrafted lotion and have succeeded after educating myself with Anne Watson’s “Smart Lotionmaking” book. I’m ready to venture into my own homemade cosmetics for all the many reasons you have, too. Right now, I have a huge supply of stearic acid, emulsifying wax, and conditioning emulsifier. I do not have any beeswax on hand however. If I were to prepare your recipe sans beeswax, I would think stearic acid might be a decent replacement. Do you have a knee-jerk reaction to this substituion? Can you suggest an appropriate amount/weight worth of stearic acid or e-wax to create a similar foundation? I’m still very new to this but am eager to learn. I haven’t had a moment to order beeswax and I live in a very rural area, so I’m unable to run out for a beeswax purchase since it doesn’t exist in my area. I’d be so grateful for any feedback you could provide. Many thanks.
Hi Sarah,
I am sorry, I cannot advise with those ingredients, as I do not use them (and do have a knee-jerk reaction to them…so sorry). :/ The beeswax is a pretty essential element of the foundation and I cannot see that anything other than another wax would work. That said, if you give it a try without the beeswax, please let me know how it works. I would love to hear!
Best,
Jess
This looks amazing and I can’t wait to try it! I have one question though, how does it wear in the heat and the humidity? I live in the south…
Hi Sarah! It’s fab! The beeswax gives it extra ‘staying’ power. I’ve had no problems. It wears generally the same as the toxic ones we are mostly used to. 😉 Thanks for stopping by!
Thank you Thank you Thank you for this miracle recipe! I made some myself last week and have used it a few times and it is amazing. I have horrible HORRIBLE skin and this does a wonderful job of evening my skin tone. I use powder foundation over the top for the coverage I need, since like you said this is very light coverage. Even with acne and scars this along with the powder foundation over top is the best coverage I have ever been able to achieve. My skin tone is also extremely light almost transparent and the light version of this recipe was the best match I have ever had to my skin tone. So far my skin has not broke out from any of the ingredients (even though they are all natural my skin can be very picky). I cannot thank you enough for sharing this, I am so happy to finally have found the perfect makeup that is completely natural and healthy! THANK YOU!!!
Awwww, your comment just made my morning! <3 You are so very welcome. I'm happy to hear that you love it, too. Thanks so much for stopping by to let me know. xoxo
This looks awesome and I can’t wait to make it.
I do have one question — what oil can I use in place of the Almond oil (I’m allergic)?
Thanks!
I used coconut oil and it worked great!
Hi Jessie! Thanks for stopping by. Yes, you certainly can substitute any other liquid carrier oil in place of almond. You could use jojoba, apricot, etc etc etc. Click on the link for almond oil above and you’ll see lots of other potential carrier oils you could use. Happy DIYing!
Great recipe! Thank you for sharing.
I just made a couple bathes. The first batch, I made the mistake of adding geranium essential oil to it- it really did not match the scent of the other ingredients and I had to toss it 🙁 I think the cocoa butter is enough of a scent. I aloe used hemp seed oil- it is great for eczema.
Also, a tip for others: I added a little bit of turmeric to match my golden skin tone. Worked very well with just a 18 teaspoon.
Fantabulous tips, Lisa! I love that you added hemp seed oil, too. That’s a staple in my home. Yay! So glad that you love it, too. 🙂
This looks awesome!! I am going to try and make it but just wondering a little about the zinc oxide. The place you have listed to buy from has a minimum $100 order or there is an extra $20 charge and I’m having a hard time finding the uncoated and non nano anywhere else. So, my questions is do you have to use zinc oxide or can something else be used thats a little easier to find? Thanks so much!
Hi Rebecca. Ahhh, yes. They recently changed their ordering guidelines. :/ If you scroll through the comments here someone else was able to source a non-nano & uncoated zinc oxide on Ebay. They provided a link, I believe. I have not used that source myself, but that would be good to check out. Thanks for stopping by and happy DIYing! 🙂
“…my own facial powder, but feel no need to share the recipe here because my dear friend Kristin at Live Simply has already written up her recipe and it’s incredibly similar to mine. Why recreate the wheel!? Since my powder recipe is so similar to hers I know that her powder will work incredibly well over this foundation.”
I understand that. If you would not mind would you please post what you do Differently with your powder recipe, so that would give us two options. We would appreciate it. Thank you!
Great idea! I’ve seen powder foundation DIYs but never cream. Pinning.
Thank you for sharing your recipe. I have been looking for an all-natural foundation of this type. If I leave out the sunscreen, would I need to adjust the amounts for the other ingredients? Can this be made as a full-coverage foundation? Thank you.
Hi Diane,
Well, the zinc oxide is crucial to getting the consistency. It will not set up without it. You could try arrowroot, but I haven’t tried that myself do cannot tell you amounts.
You can use oxides instead of cocoa powder for full coverage. I’ve done that with success.
Jess
Thank you. I don’t know a lot about oxides. I will make it according to your original recipe. I might be brave enough to try using oxides instead of cocoa powder on a future batch. lol I will do some research and see what I can find. If I make it using arrowroot or oxides, I will let you know how it turned out.
I can’t wait to make this foundation myself!
I’m purchasing all the ingredients in bulk and am concerned about them expiring before I use them up. Do you have any suggestions for this?
Potentially I could use up all the ingredients by making a few batches of foundation but I am concerned about the foundation expiring! What is the approximate expiration on the foundation?
Thank you!
I love this idea! I don’t even recognize most of the ingredients in the store brand that you listed ~ scary.
Thank you for sharing this at DIY Showcase on VMG206.
~ Megin of VMG206
i’m buying my supplies to DIY a powder and would like to do a foundation and a moisturizer. I have sensitive skin and use Miessence right now. They have a nice rejuvenating moisturizer that is supposed to be really good for maturing skin, which I have (loads of ingredients for nourishing the skin). I am wondering if you have a suggestion for what I could make that would work along those lines. Currently I use a lightly tinted light coverage foundation and a concealer when needed (typically I use one under my eyes) and a translucent facial powder. And the moisturizer, of course. Thanks! I might be willing to buy some of yours if you have some.
Hi Adrienne,
Thanks for stopping by! Yes, I do have a nourishing facial moisturizer. I have not posted the recipe on my blog, but have been filling custom order requests for it in my Etsy shop.
If you want to send me an email I’d love to chat more about it!
scratchmommy AT scratchmommy DOT com
I think it will fit your needs, as it contains excellent quality, very nourishing ingredients. I love it for my skin (I’ll be 35 this month) an my Mom loves it for her skin (she’s 65)…so it’s really just a great facial moisturizer, in general.
We can chat more about your other DIY projects, too. 🙂
Best,
Jess
I’m interested in the nourishing facial moisturizer too!
This seemed so awesome so I tried to make it last night but it hasn’t became solid like in your picture yet. Would putting it in tne fridge help? I noticed that it has no color either and it is insanley greasy and made my face look unbelievably oily 🙁 I don’t know if that will change when it’s soild or not. Do you think if I used less alomond oil that would help? And what do you suggest for a little coverage in the foundation?
Thanks in advance!
Hi Kelsey,
Well, that doesn’t sound right, at all! I never have to set them in the fridge to set up.
Just brainstorming here…
*Did you use a scale to measure accurately? Is your scale accurate? I know that one I had two before this one started measuring things incorrectly.
*It does sound like you may have used too much oil.
*You didn’t leave out the zinc oxide, did you? That is crucial to the recipe setting up properly. It would never set up without the zinc.
Thanks for stopping by and let me know your thoughts. I’m happy to help brainstorm!
Jess
It’s possible it’s my scale. I tried again and made it with way less oil and it set fine it still doesn’t have any color though and I put about 3T of cocoa powder and even added nutmeg and ginger with the cinnamon ):
I added the zinc though for sure SPF is nice haha 🙂
Thanks for replying!
Just received this in the mail…I ordered the medium color. Unfortunately, there is NO color to it. It goes on shiny and smooth but I see absolutely no color on my face. I am medium fair so would have thought the medium color would be enough. Plus, all I could smell all day is chocolate!
Hi Stephanie,
I am sorry to hear that the color does not work well for you. :/ I use the medium with great success and my powder sets and finishes it beautifully.
I never notice the chocolate smell myself, but that could be because I am slathered in my cocoa butter body butter all day, too. 😉
If you would like to send me an email we can certainly chat more. I love chatting healthy skincare solutions!
scratchmommy AT scratchmommy DOT com
Best,
Jessa
Wow! So cool and so great that it’s all natural! I wear an all-natural one right now, but the cost is outrageous…I think I will give this a try! Awesome post! 🙂
Thanks Suzanne! Yes…the cost can get a bit outrageous, that’s one (of many reasons) why I make all of my own. Whew…very expensive!
Thanks for stopping by!!!
Jess
As a makeup artist myself, I must say I’m impressed. Will swing by your shop you put in my order.
Hi Nicole,
Oh wow…well, thank you so much! <3
...and thanks for stopping by.
Jess
I find your use of uppercase and lower case “T” or “t” confusing. Are we using tablespoons or teaspoons?
◦Add cocoa powder a little at a time and whisk to get to the color you need… ◦1/2T cocoa powder is a light foundation
◦1/2T plus 1t is a medium foundation
◦1/2t plus 2t is a medium-dark foundation
◦Simply start with 1/2T of cocoa powder, whisk to combine, check on your wrist for a color match, and add more cocoa powder (1/2t at a time) until you reach your perfect color
Hi Melissa,
Oops. I made one mistake, but have updated the post. T-Tablespoon and t-Teaspoon.
Thanks for stopping by!
Jess
I just followed the recipe and I am impressed. Very easy! I am pretty fair but I ended up adding more cocoa powder, I kept testing it until it matched my color. Very smooth consistency. I love it.
I also purchased the ingredients from your recommended sites and some on Amazon.com. It was a little expensive but I have enough product for a least a year.
Thank you!
Hooray! I’m so happy thst you like it. You are very right…playing with the amounts of cocoa powder and cinnamon is key.
Thank you for purchasing through my links, too. Every little bit of small commission I make when people purchase through my links helps me to pay to keep my blog running (it gets quite expensive).
Enjoy your new foundation and keep checking in on my blog. I have lots of other great (healthy, non-toxic) DIY makeup recipes coming soon!
Jess
Hi,
I am so excited I found your site. I use to make my own skin care products, but after having babies I became too tired and busy. However, this recipe has definitely inspired me to start back up. I really want to try this foundation, but I live in the desert so I’m concerned how this will just become incredibly oily and melt right off? OR would I be able to control the oiliness by using a powder?
Hi Angela,
Hooray for DIYing! Glad to hear you are ready to get back into the swing of things.
No, you would be fine with this foundation anywhere. Your powder will set and finish the application of the foundation perfectly.
Thanks for stopping by,
Jess
Cinnamon is a known skin irritant for a lot of people. I would advise using something else. I make and sell soap, and any scent with cinnamon in it, I advise people not to use on their face.
Hi Sharon,
Thanks for your comment. Yes, cinnamon is a skin irritant for some people, just like a multitude of other things. People react differently to different things, as you know from your soap making.
I’ve been using cinnamon in many of my skincare products for years with no ill effects. If people experience a reaction, nutmeg could be used or oxides or a host of other ingredients, instead of cinnamon. …or, it could simply be left out.
Thanks for stopping by,
Jess
I was wondering about clogging of pores? I have sensitive, but active skin. I would hate to make it, then have a massive breakout!
Hi Tricia,
I totally understand sensitive skin. There’s a lot of that in my house, too.
Gosh, the only thing I can suggest is to try it out. Maybe cut the recipe in half at first, just to give it a go. The ingredients in this foundation are very healthy for skin, so my hunch is you’d be pleasantly happy, but everyone has different skin.
Let me know if you give it a try! Thanks for stopping by,
Jess
I LOVE this idea! But… I am highly allergic to Shea butter and cocoa. Can I substitute these two items and still have a successful, healthy foundation??
Is it possible to substitute the Shea Butter and Cocoa? I am allergice to both, but I have searched so much to find a healthy, working foundation for my face. I love this idea and I would love to be able to make it a success for me, without being able to use the cocoa and Shea butter…
Hi Kayla,
Thanks for stopping by! Sure, you could certainly substitute. There are many other healthy butters available, such as mango and a host of others.
Simply click on the link above for cocoa butter and you’ll go to a site that sells many other healthy butters. I’d select two…One that is soft (like shea) and one that is soft, but more solid (like cocoa).
Let me know if you try it with different butters and how it turns out!
Jess
So cool! I didn’t know you could make your own!! Lol.
Can I leave the cinnamon out? My skin is very sensitive and anything with cinnamon in it usually causes my skin to burn and have redness. What is the purpose of it?
I used to make my own skincare products before children, and I was just starting to dabble in it again. Your website is fabulous!
Hi Brittany,
Absolutely! It just gives the foundation another hint of color to make it more well-rounded. Feel free to leave it out or even replace with nutmeg. Play with the recipe and have fun!
Thanks for stopping by,
Jess
PS Thanks for the Oh So Wonderful compliment. <3
What a neat idea! I hate wearing foundation because of all the nasties but this homemade DIY version is awesome. And with sunscreen too! Awesome squared!
A question – even though it has zinc oxide, the foundation alone will not be enough sun protection for an entire day. If I am planning to stay outside, you’d need to apply sunscreen every 2-3 hours or so. Can I use this throughout the day without making the color darker each time I apply it?
Hi Karen,
Golly. Great question! It’s been cold and snowy where I am (boo!) so I’ve not tried this. I cannot say for sure.
I would try it out and see what happens (only one way to find out!), or just apply your regular sunscreen underneath and bring it along with you to reapply if you are worried about too much coverage. My hunch is you’d be okay, because it sounds like you’d be hot…when I’m hot, most things slide off of my face anyway, including the sunscreen after a couple of hours. I just really can’t say for sure.
Let me know if you try! Thanks for stopping by! 🙂
Jess
Do you think this would work as an under eye concealer? My under eyes are very red and I have to use a bright concealer, brighter then my foundation. Maybe I could make a small batch of the light? I also was wondering if you thought it would make my brown freckles seem gray like some foundations do. I’m super excited to try this!
Thanks. 🙂
Melissa
Hi Melissa,
Thanks for stopping by! Great question. The foundation provides even, light coverage, so you might need a little more coverage for under the eyes. I have a DIY concealer that I use when I have dark circles from lack of sleep or something. I need to get that post up on the blog! So, I’m not sure it would give you enough coverage for just under the eyes.
As for the freckles…that’s another great question! I don’t have many freckles, at all. I get a few in the summer, but not many that are noticeable. This foundation provides light, smooth coverage for me. It evens out my skin tone and makes it uniform in appearance. Once I add my powder over the top, it’s perfect coverage for me. You might just half the recipe and see how it works for you before making an entire batch. I often do that with DIYs I try out from blogs.
I hope that this helps answer your question. I am going to have my hubs snap a few before and after pics, as well as side-by-side pics, to help people see the coverage. Pictures are always nice to see how something works. …I am just not into selfies and need help from the hubs. Haha!
Thanks again for stopping by,
Jess
It is important to note that especially since this is an organic product without preservatives that care is taken to prevent cross contamination. Hands should be washed immediately prior to use and if a sponge or brush applicator is used they should be washed daily to prevent bacteria growth. These suggestions also apply to OTC cosmetics, but even more so with preservative free products. I am aware that OTC sunscreens have a short shelf life, do you know if zinc oxide has an expiration date and the approximate
shelf length.
Hi Phyllis,
Thanks for your note and tips. Yes, I agree that care should be taken with ALL skincare products that we apply.
In this recipe the Vitamin E serves as a preservative, and it’s actually a very good one.
The expiration date on the zinc oxide I currently have at home is March of 2015. I purchased it approximately 6 months ago.
Thanks again for stopping by,
Jess
wow, I’ve never thought of making my own foundation!
would you mind posting swatches either here, or on your etsy site, of how the foundation looks on skin? That would the best way to show off the coverage and type of finish (I assume it’s kind of dewy because of the oil-base?). That would be really helpful, I’m thinking of purchasing some from your shop! Cheers!
Is the zinc oxide for sunscreen purposes only or does it thicken it?
Hi Megan,
Excellent question! The zinc oxide does both…serves as an SPF factor AND thickens. So, you could definitely not simply leave the zinc oxide out, as it would not set up properly…and it would be very, very dark. The zinc oxide also helps to lighten it.
Someone else had mentioned trying arrowroot. That might be an option, although I have not tried it.
Thanks for stopping by,
Jess
I just used arrowroot in mine and it seemed to work fine! I think I had to add a bit more than the suggested amount for the zinc oxide though.
Mine did end up really really goopy though, more like body butter. I think my scale is crap 🙁 Is there any way you can post measurements in tsp and Tbsp of the oils and butters? I really want this to work!
Wow, What a fantastic recipe! I love the idea of making your own custom blended makeup free of nasty chemicals and ingredients you can’t pronounce. Thanks for sharing! I have to try it.
I have most of these ingredients on-hand so I’m really excited about this! My only question is the color. I’m pretty pale, so I’m not sure how cocoa powder could match my skin tone. Any suggestions for a lighter tint?
Hi Kelly,
Thanks for stopping by. Great question! You know, since you add the zinc oxide, which is white, the directions I provide for the light color truly is light. If you are concerned, though, just start by adding half of what I suggest at first. You can always add more, but cannot take it out…know what I mean? Just test on the inside of your wrist as you go to get the correct color.
Hope this helps. Happy DIYing!!!
Jess
I added a bit of ginger to mine for a bit more depth to it 🙂
i went to the suggested site and you now have to purchase $100.00 worth of merchandise which I can’t do . Would you know of another place I can purchase the zinc oxide. I did a search Amazon has one non-nano zinc but it has other stuff in it. HELP!! I am so excited to try this I make my deo. and toothpaste and am really interested in foundation and powder. Thank you for posting this and any advice you can give me. Doris
Hi Doris,
Oh gosh…really!? Wow, they must have changed that recently. Yikes! That is where I always purchase my zinc oxide. I do not know of any other place that offers non-nano. If I come across any online at any other place I will definitely update you here. So sorry to hear that they changed their policy!
Just wanted to let you know I found some on Ebay. It is not kosher certified but it is non nano. arielland is the seller.
Doris
Oh, that is great to hear! Thanks so much for the update. I appreciate it and know my readers will, too.
Thank you, thank you! 🙂
I clicked on your link for the zinc oxide and found that it was only $4.80 for 1.1 lbs which I assume will go a long way. Shipping was $11+ but I might add a few more things to make it worth it.
This is a super cool idea. I’d really like to see what it looks like on someone, though- just a thought!
Pinning.
Hi Jamie,
Thanks! Yes, I plan to update with a picture. I hate taking selfies, so I need to enlist hubs to help me out with a pic. 😉
Thanks for stopping by and for the pin!
Jess
DIY makeup?! That’s a new one to me and I make my own EVERYTHING! I want to do it now, just to say I can! And also to see if the cocoa powder makes my face smell like a fabulous chocolate chip cookie all day. 😉
Elizabeth,
Haha! This comment made me giggle. I think I like you. Hehe. Actually, it mixes beautifully with the shea butter and the shea butter comes out more than anything. The zinc oxide kind-of neutralizes it, too.
Let me know when you give it a try. Thanks for stopping by!
Jess
I am so excited about this! I mean really, really excited. Don’t have income at the moment, but this at the top of my priority list for when I do. Not sure if I’ll make my own or take the much easier route and purchase from you. Either way, thank you so much for this!!
Hi Jaye,
…comments like this just make my day. <3
I am happy to hear your excitement. THAT is why I do what I do with my blogging and skincare creation endeavors.
Thanks for stopping by,
Jess 🙂
I’m also curious about how long this lasts. I’m also wondering how light the light recipe is. I have Irish skin – freckles and very pink skin! Will this foundation work for me?
This looks fantastic! Can’t wait to try!
Hey Chloe! 🙂
Super question. The light is pretty light. All of the foundations are ‘light’ in coverage, too…meaning that they aren’t super thick and a type of foundation that leaves lines around the edges of your face (does that make sense)?
If you are making it yourself, you could always play around with the cocao/cocoa powder and cinnamon until it suits your need. If you are ordering through the shop, you could always send me a closeup picture of yourself in natural light so I could tell you which one would work best (and possibly tailor it for you). You could submit through a custom order in my Etsy shop.
I hope that this helps. Thanks for sharing in my excitement for my new recipe! 🙂
Jess
Can you leave the zinc oxide out? And maybe use arrowroot instead.
Hi Carolyn,
Great question! You are definitely onto something, in that the zinc oxide does help to thicken the foundation. I have not tried arrowroot, but that would be my second thing to try behind zinc oxide. I would start slow (a tbsp) and work your way up as you stir to see how thick it is becoming. It will thicken the most, however, as it sets.
If you give it a try, please stop back by and let me know how it works!
Best,
Jess
This is the only foundation I use now, and at first it was a little bit oily. Typically I smooth it over my face, wait and let it set in, then blot some of the oil off with a tissue before applying powder. However, for my second batch I decided to add some arrowroot powder in addition to the zinc oxide, and I love it” It works great for my skin. Not only does it help to further balance the oiliness, it actually creates a really nice matte finish.
This is really cool and sounds amazing. Roughly how long will one of those little tins last? Thanks!
Hi Christie,
Thanks for stopping by!
Well, that is a great question. I cannot give you a specific timeframe, as it depends on how much you use and how often and how thickly you apply it.
For me, I apply it moderately to my face. I use probably about a pea-sized amount (maybe a little more) to cover my entire face.
I hope that this helps!
Jess
I was wondering how long it is ‘good’ for? I made my first batch and had a tablespoon in my hand rather than teaspoon so it came out WAY to dark, so I’m going to hv to make more of the first part of recipe and add my color one too it :/ any suggestions on making that process easier would be great too lol!!
thanks
Nicole
Author
If you separate part of it and keep it sealed tight (no air, no bacteria able to enter) you can make it into two batches! I make a 4 oz container for myself and use a small amount probably 2-3 times a week; I’ve never had a batch go bad. Hope this helps!